Phonet is an IP telephony service, a virtual PBX for business. Once connected to Skynum, every call becomes part of your client work: the manager knows who is on the line before answering, conversations land in the journal together with recordings, and an unanswered call is never forgotten — the system creates a task to call the person back.
This page covers the Phonet connection itself. The overview of what telephony can do — the call panel, the journal, missed call handling, analytics — lives separately: telephony in Skynum.
What the Phonet connection gives you
Skynum receives call events from Phonet and builds working scenarios on top of them:
- A live call panel: the client's name, debt, and open orders on the manager's screen while the phone is still ringing.
- A complete journal of conversations — with the recording, duration, and the manager who talked.
- A callback task for every unanswered call — created and closed without human effort.
- One-click dialing from any place in the platform where a phone number is visible.
- Smart call routing: Phonet connects a regular client to their responsible manager first.
- Calls in one timeline with messaging on the client's Communications tab.
The setup takes three steps: grab the API details from the Phonet integration page, create the connection in Skynum and map your people, then return to Phonet and hand the Webhook URL to the event fields.
What to prepare in Phonet
- A working Phonet account with a number that already receives calls.
- Employee extension numbers registered in the account.
- Access to the Settings → Integrations section.
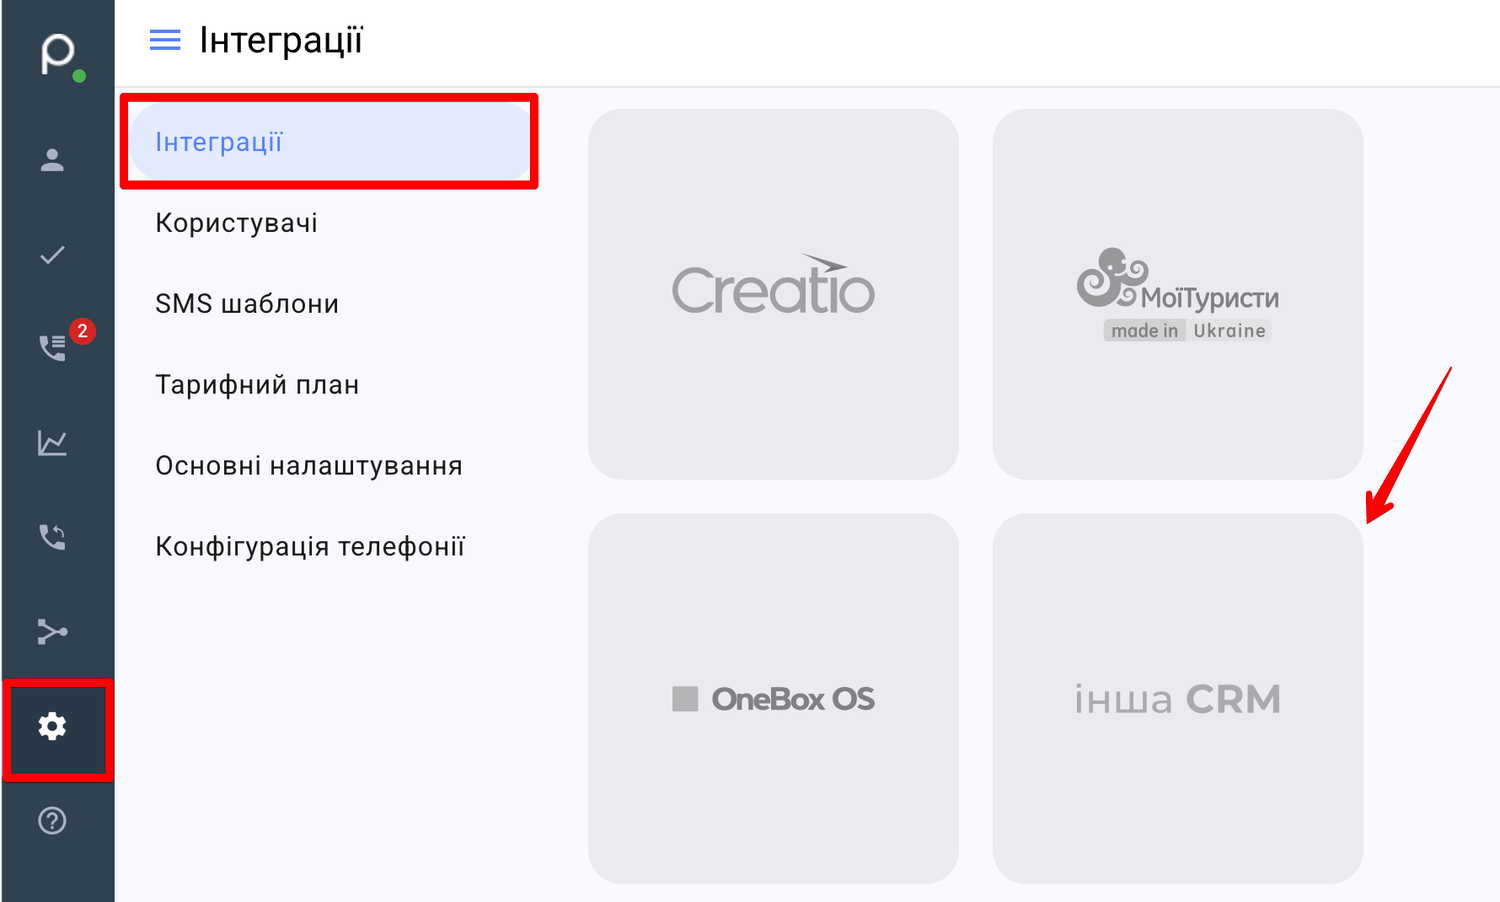
Everything you need sits on a single page:
- In your Phonet account, open Settings → Integrations.
- Pick the other CRM tile — the Integration with another CRM system page opens.
- On the right, in the API authorization data block, copy the API server and the API key.
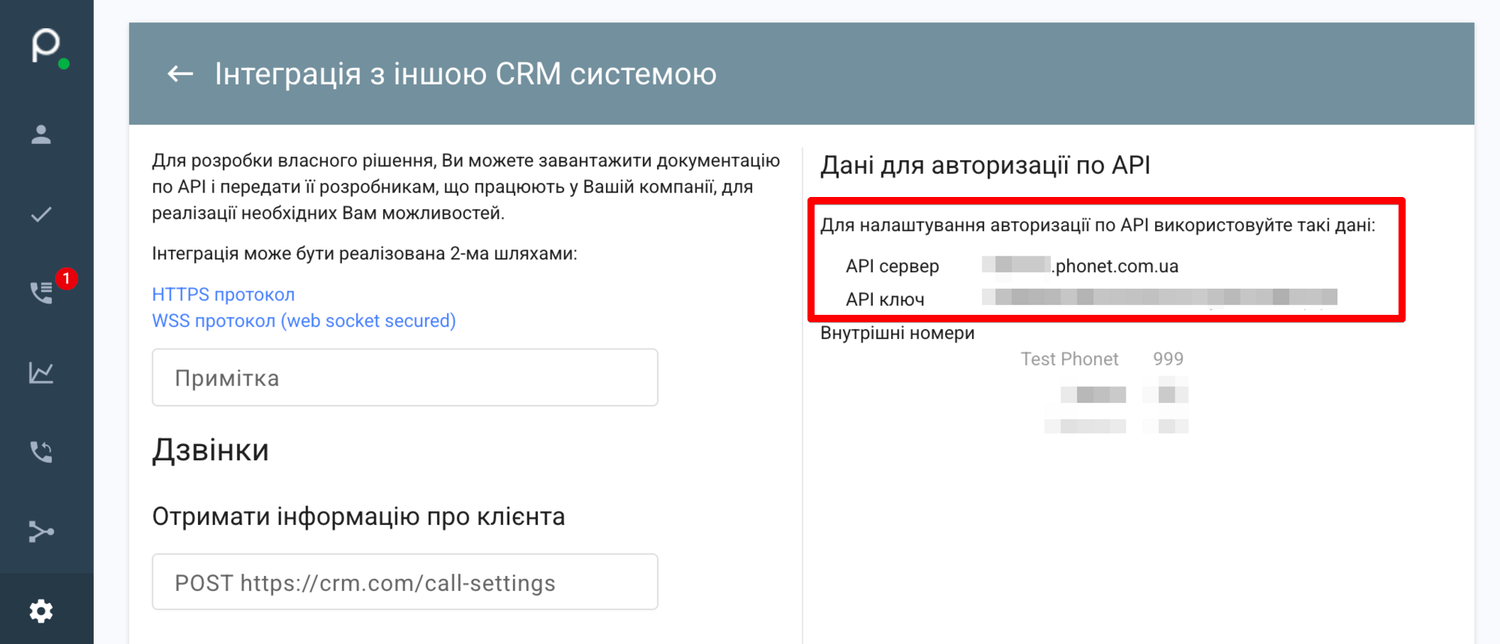
These two values go into Skynum: the domain from API server into the Host field, the key into the Token field. Keep the key to yourself, out of chats and screenshots: it opens programmatic access to your PBX. Don't close the page — you will come back to paste the Webhook URL.
How to connect Phonet in Skynum
The connection is created in Settings → Integrations, the Telephony category — this is where all of the company's telephony lives.
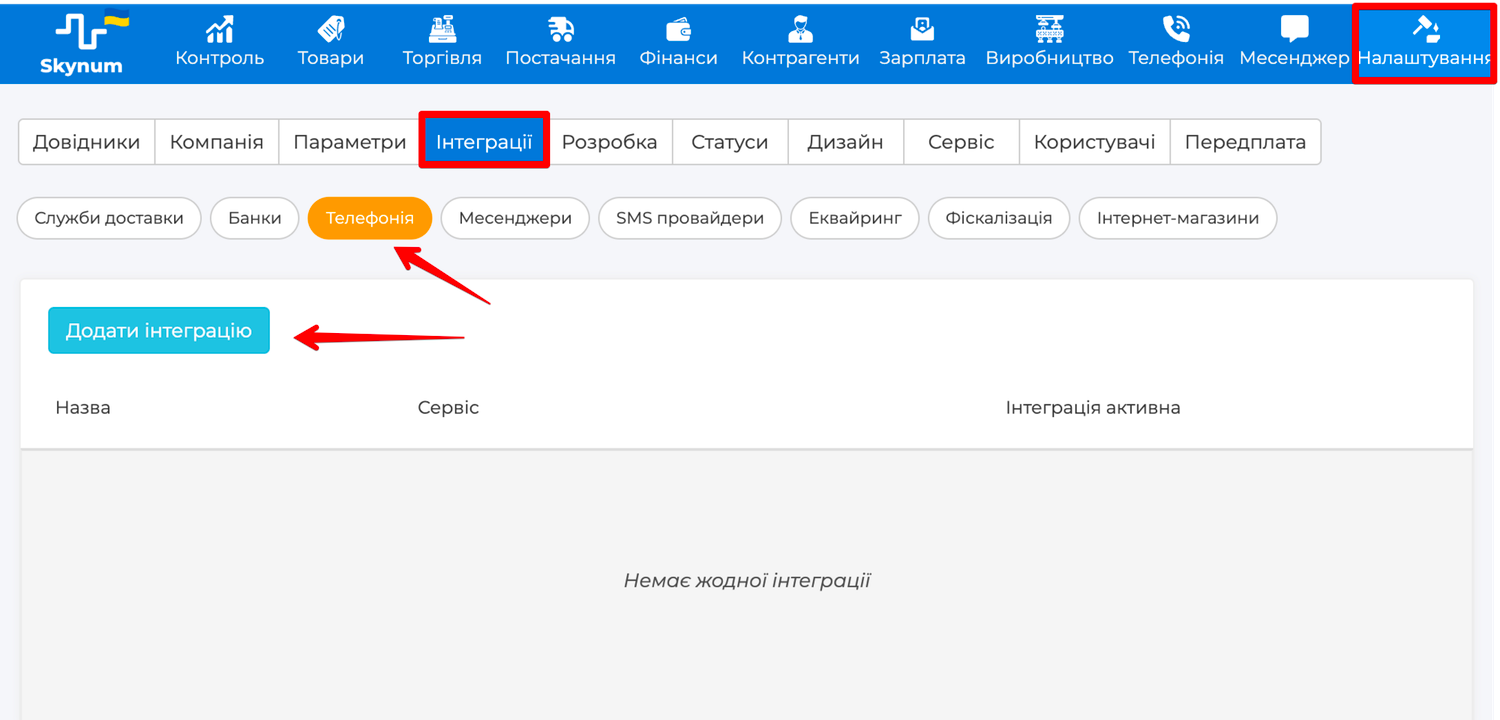
- Click Add Integration and choose Phonet.
- Fill in the form — the fields are explained below.
- Click Check Connection and save.
Integration fields
- Integration name — the connection lives under this name in Skynum lists; name it so you can recognize the number or the account.
- Integration Active — while the switch is off, events from Phonet are not accepted.
- Default — matters when there are several telephony connections: one-click dialing goes through this one.
- Automatic task for a missed call — on by default; turn it off only if you don't need tasks for unanswered calls.
- Host — the domain from the account's API server field, like company.phonet.com.ua, without https://.
- Filial — set it when the number belongs to a specific branch; with no branch the telephony is shared across the company.
- Token — the API key from the Phonet account.
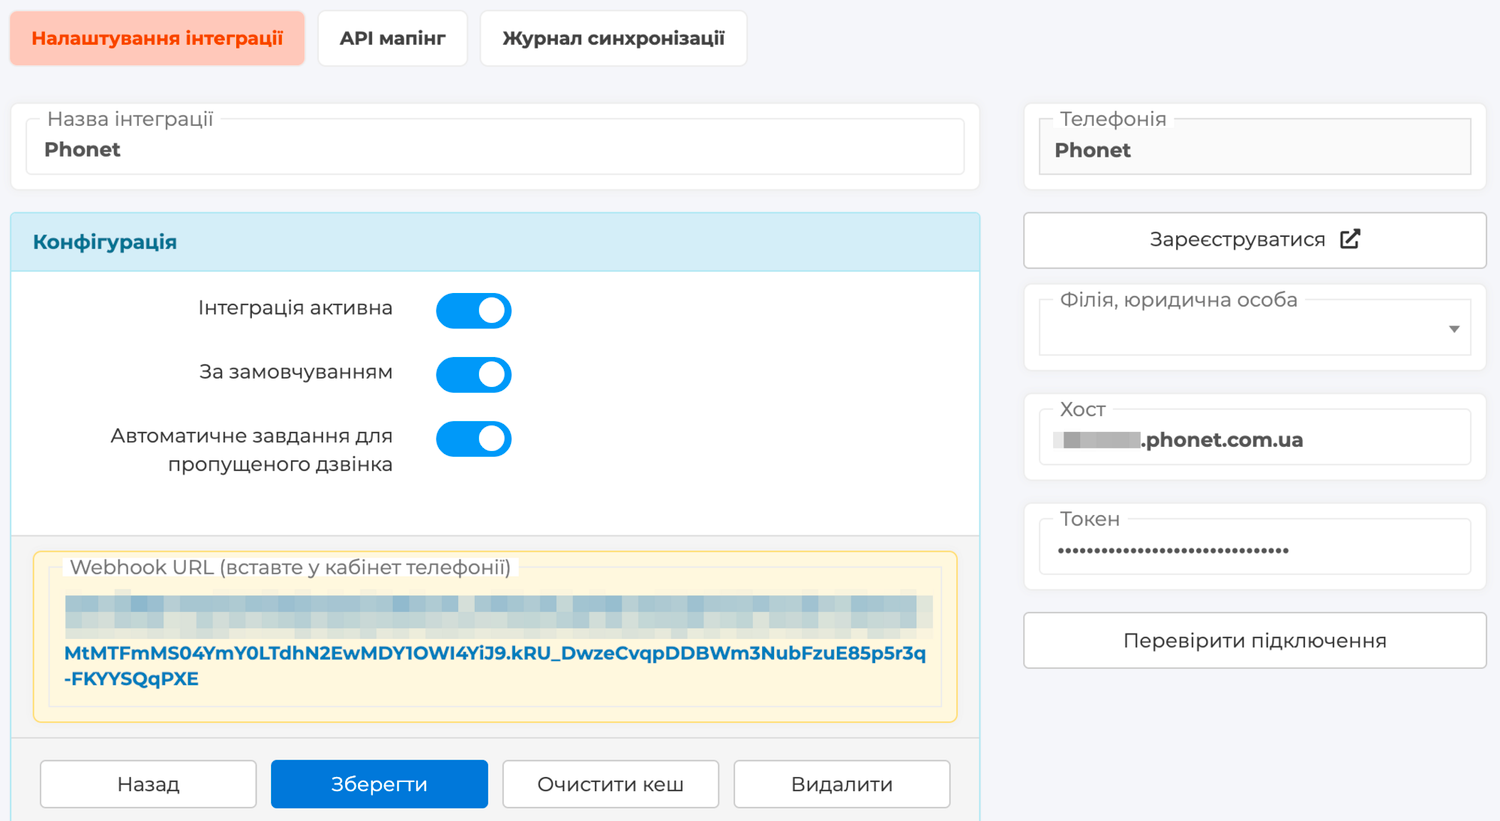
Once saved, the integration shows the Webhook URL (paste it into the telephony account) address at the bottom of the page — copy it in full.
One address for everything: this Webhook URL covers all call events in Phonet and the responsible manager lookup for smart routing.
API mapping: Skynum users and Phonet extension numbers
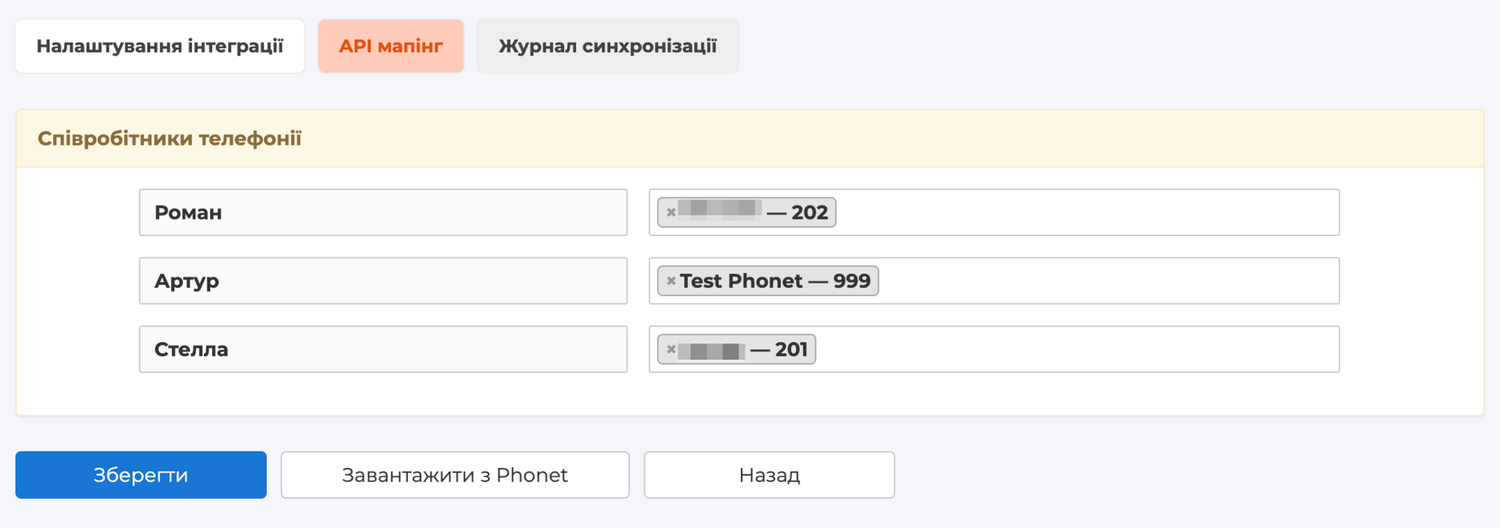
The mapping answers the question "whose conversation is this": without it Skynum cannot match a call to a manager.
- Open the API mapping tab inside the integration.
- In the Telephony employees section, assign each user their extension numbers; an empty directory is filled by the Load from Phonet button.
- Save.
An outgoing call starts from the employee's first number in the Phonet directory.
Call event webhooks in Phonet
Call events are the real-time channel: they light up the call panel the moment the phone rings, and the journal doesn't wait for synchronization. Return to the Integration with another CRM system page and place the copied Webhook URL into the event fields:
- The Full call information transfer field.
- The User events section: Call start, Call answered, Call finished.
- The Group events section: Queued and Call finished.
- Save the form.
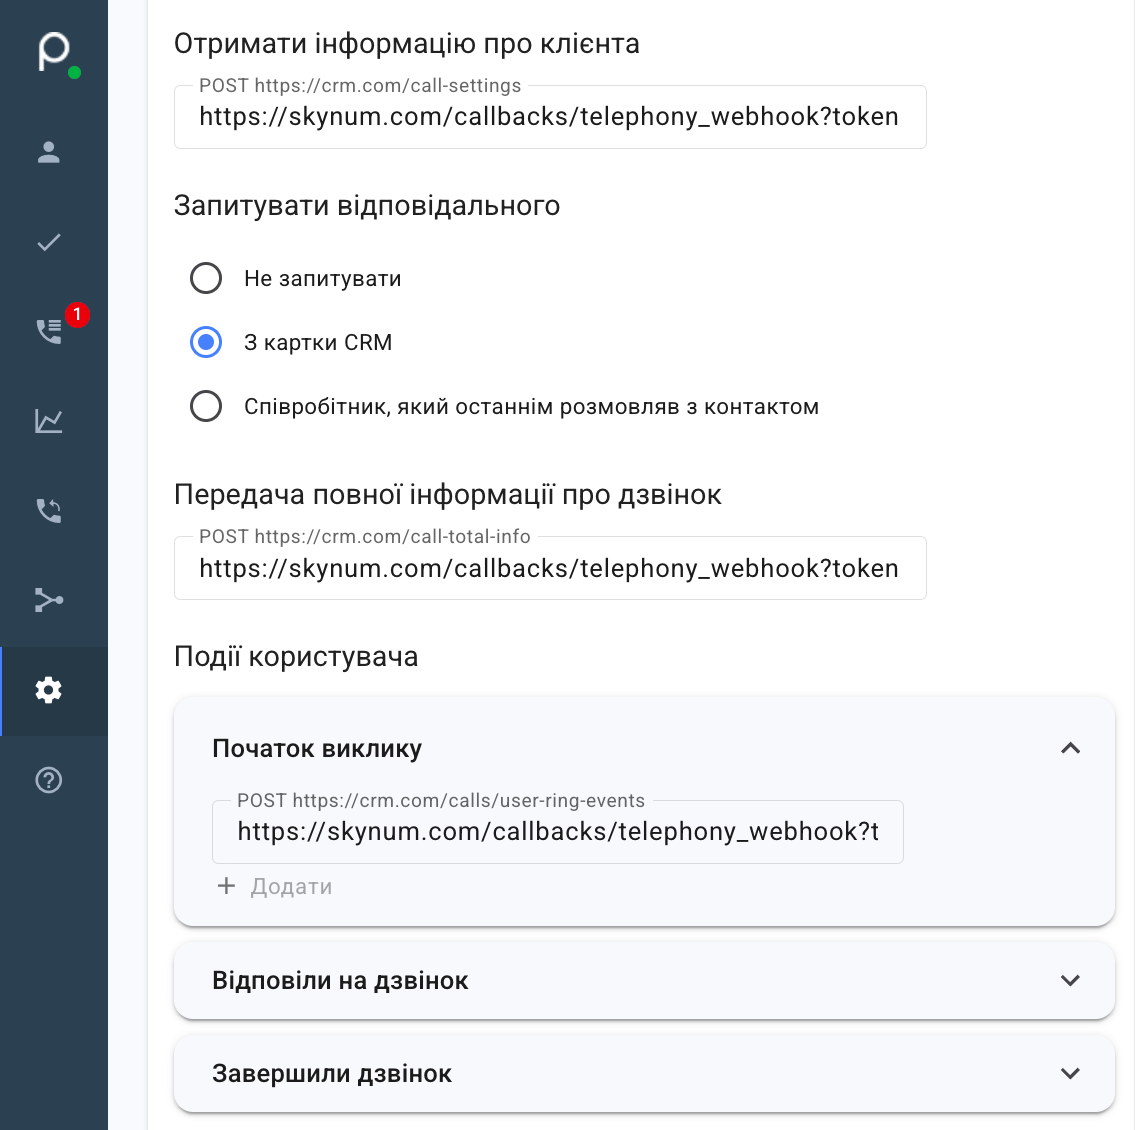
Important: incoming calls in Phonet go through a group or a department, so it is the Group events that deliver an incoming call to Skynum. Filling in only the User events leaves incoming calls without the call panel and without tasks for unanswered ones.
The + Add button under the fields is meant for several receivers at once — Skynum needs a single line. Leave the Send UTM tags for calls field empty.
Smart call routing in Phonet
Routing hands a regular client's call to their responsible manager ahead of the common group. This part is optional — the rest of the integration works fully without it.
No separate call scenario is needed in Phonet, everything is on the same page:
- Paste the same Webhook URL into the Get client information field.
- In the Ask for the responsible block, pick the From the CRM card option.
- Save.
From then on, before connecting, Phonet asks Skynum for the responsible manager's extension and leads the call to them first. An unknown number, a client without a responsible manager, or a busy manager — the call continues along the group's usual route; no fallback steps to configure, because the PBX itself stays in charge of the call.
A routing bonus: along with the responsible manager's number, Skynum sends the client's name, and it shows on the employee's SIP screen during the call. Phonet caches the answer for a few minutes, so a change of the responsible manager takes effect with a short delay.
Working with calls
An incoming call opens a panel in the corner of the screen: who is calling, what they owe, which orders are in progress. An unfamiliar number turns into a new client right there or gets attached to an existing one — the base grows during the conversation.
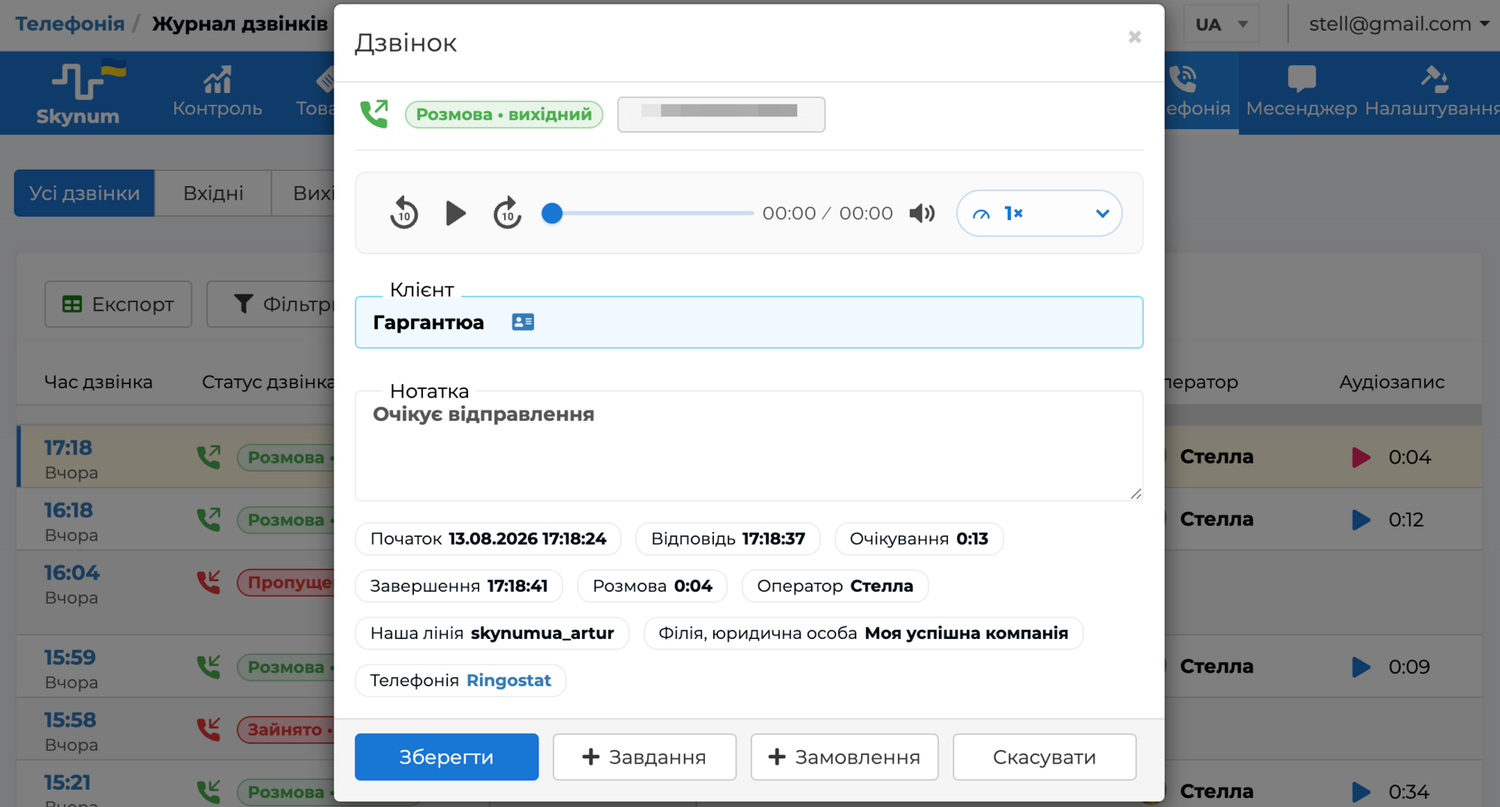
A finished conversation lives in the Telephony section: the recording plays right there, next to the manager's note and the next action. A customer order is created from the same place — the link to the call is preserved, and analytics honestly counts how many conversations ended in a sale.
An unanswered incoming call becomes a callback task: it goes to the responsible manager or into the unassigned queue, gathers the client's repeated attempts, and closes itself as soon as the conversation happens.
A click on a phone number in any card offers Call: the manager's extension rings first, and after the answer Phonet connects the client. A filled-in mapping is all it takes — nothing to enable in the Phonet account.
The full overview of these scenarios — telephony in Skynum.
Checks after connecting
- Dial the company number from your own mobile and wait for the call panel on the screen.
- Talk and finish the call — Telephony → Calls journal must show the conversation with the manager and the recording.
- Dial again and don't answer: check that a callback task appeared.
- From any client's card, click the number and choose Call — make sure the outgoing call goes through.
- For routing: a call from a client with a responsible manager must reach that manager first, a call from an unknown number must go to the group.
Summary
Connecting Phonet means the API server and key in the Host and Token fields, the extension number mapping, and one Webhook URL in every event field of the Integration with another CRM system page. Smart routing is enabled on the same page with two moves: the address in the Get client information field and the From the CRM card option. The detailed step-by-step version with troubleshooting lives in the Skynum documentation.