Checkbox is a software RRO service for creating fiscal receipts, signing settlement documents and sending data to the State Tax Service of Ukraine. The Checkbox integration in Skynum allows you to fiscalize sales, payments, returns and more complex scenarios without manually transferring products, amounts, taxes and payments between the accounting system and the fiscal service.
Important: this article describes fiscalization in the Skynum web platform for sales delivery notes, orders and payments. For retail sales through the Skynum.Kasa app, use the separate retail fiscalization instruction.
Why the Checkbox integration is needed
The integration is needed when a company manages sales, payments or returns in Skynum and wants to create fiscal receipts through Checkbox without re-entering data in the fiscal service account.
After setup, Skynum sends data from a document or payment to Checkbox: products, quantity, amount, taxes, payment method and the buyer's contact details for sending the receipt, if this is enabled in the integration.
In Skynum, this integration is used for:
- a fiscal sales receipt based on a sales delivery note;
- returning a fiscal receipt;
- fiscalizing a payment in an order or sales delivery note;
- prepayments, postpayments and fiscal chains;
- returning a related fiscal chain;
- automatic fiscalization of online orders, if this is configured in the online store integration;
- fiscalizing Nova Poshta cash-on-delivery payments, if payment creation and fiscalization are configured for the delivery;
- sending an already fiscalized receipt to the customer through Checkbox capabilities.
Limitations and responsibility
The company is responsible for the correctness of fiscalization settings: choosing the cash register or PRRO, point of sale, cashier, receipt signing, tax groups, payment methods and the sales, return, prepayment or postpayment scenario. Skynum sends to Checkbox the data that the company's users entered in documents, payments and settings.
Before working with real sales, make sure to check a test sale, a test return and payment fiscalization. After fiscalization, receipt data is sent to the State Tax Service through Checkbox, so incorrect tax or payment method mapping may lead to an incorrect fiscal receipt.
What to prepare in Checkbox
Before connecting the integration in Skynum, prepare the account, cash register, cashier and receipt signing in Checkbox. This is the basic setup of the fiscal service: it does not need to be repeated before every receipt, but without it the integration will not be able to create fiscal documents.
- Register or log in to your Checkbox account.
- Check that the company and point of sale are added in the account.
- Create or activate the cash register / PRRO.
- Copy the cash register license key. In Skynum, it is entered in the Cash register identifier field.
- Create a cashier or open an existing cashier.
- Check the cashier login.
- Set or change the cashier password if you do not remember it.
- Configure receipt signing for the cashier so Checkbox can sign and send receipts to the State Tax Service.
- Check the tax groups that the cash register must use.
- Configure automatic shift closing in Checkbox at the end of the working day.
- Order or enable SMS receipt delivery directly in Checkbox if the company will send fiscal receipts to customers via SMS.
The Checkbox cashier login and password are separate cashier credentials used by the integration to open a shift and create fiscal receipts. In Skynum, you need to enter the Checkbox cashier password, not the password for logging in to the Checkbox account, not the Skynum user password and not the QES password.
Skynum automatically opens a shift when this is required for fiscalization, but it does not close the shift at the end of the day. To prevent shifts from remaining open after work is finished, configure automatic shift closing directly in Checkbox.
Official Checkbox instructions:
- Checkbox knowledge base;
- cash registers / PRRO in the Checkbox account;
- cashiers in the Checkbox account;
- Checkbox cashier API authorization.
How to connect Checkbox in Skynum
In Skynum, the integration is configured in Settings → Integrations → Fiscalization.
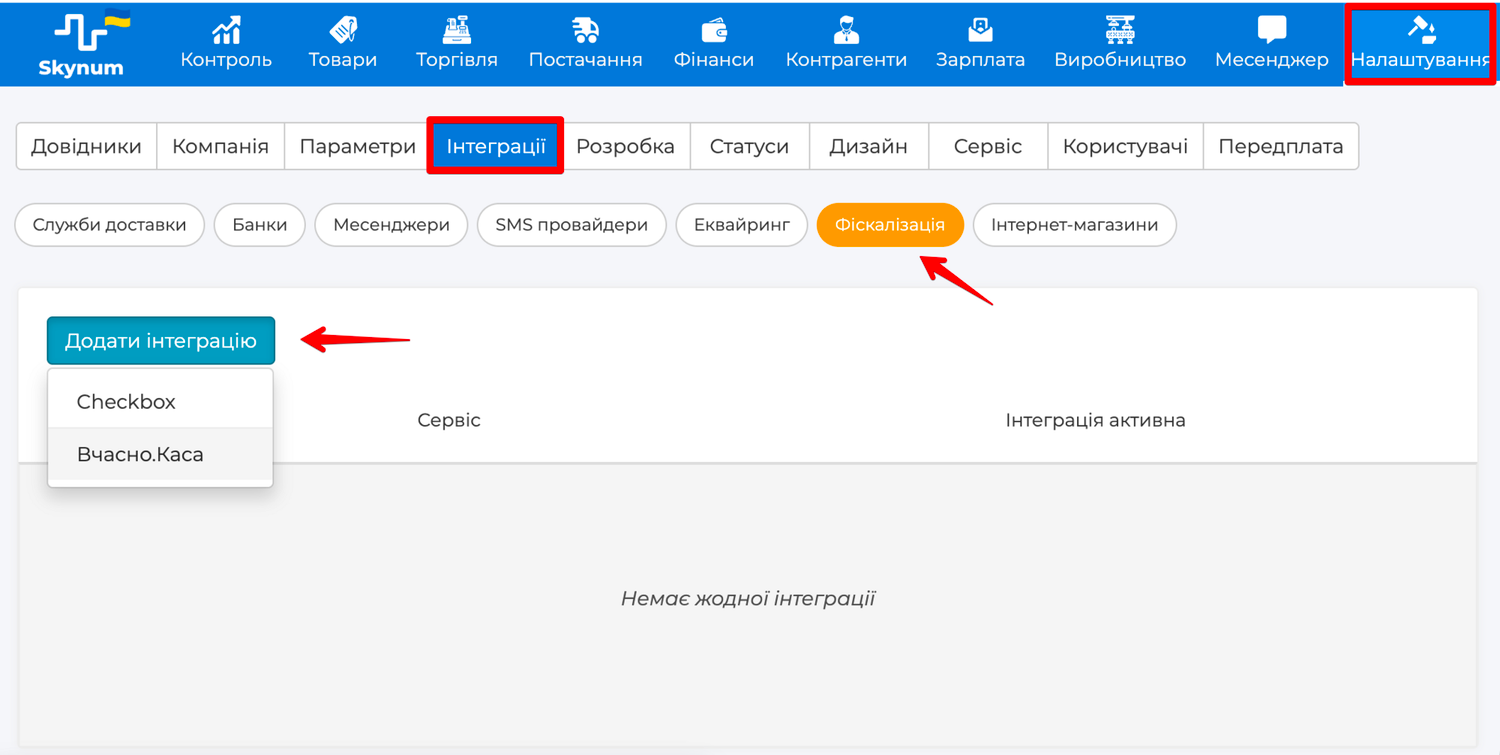
- Open Settings → Integrations.
- Go to the Fiscalization category.
- Click Add integration.
- Select Checkbox.
- Fill in the integration fields.
- Save the integration.
- Open the saved integration and click Check connection.
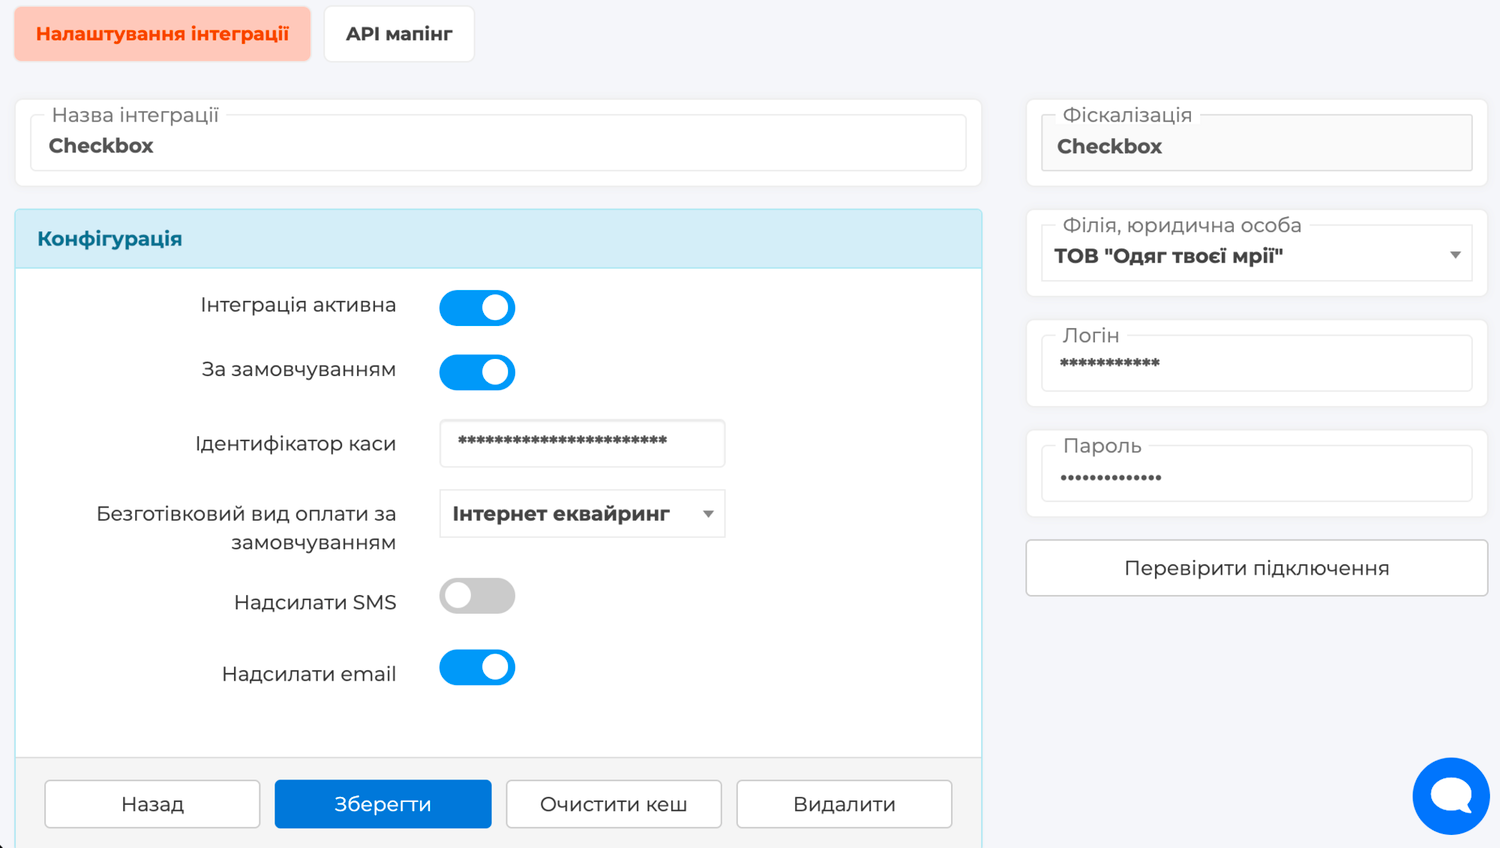
Integration fields
- Integration name — the internal name in Skynum. Enter it so it is clear which branch, legal entity or Checkbox cash register this integration belongs to.
- Integration active — enables the integration for fiscalization. Do not enable it for real work until you have checked the cash register, cashier, taxes and payment methods.
- Default — allows Skynum to automatically use this integration for the corresponding branch or legal entity if another PRRO is not selected in the document or payment.
- Cash register identifier — the cash register license key from the Checkbox account.
- Default cashless payment type — the Checkbox payment type value that will be used for cashless payment without a separate payment method. This value must match the fiscal payment type that the company uses in Checkbox.
- Send SMS — allows Skynum to send Checkbox a command to send the receipt to the customer via SMS, if the customer has a phone number and SMS receipt delivery is separately enabled directly in Checkbox.
- Send email — allows Skynum to send Checkbox a command to send the receipt to the customer's email, if the customer has an email address and receipt delivery is configured in Checkbox.
- Branch, legal entity — the Skynum branch or legal entity for which this Checkbox cash register works.
- Login — the Checkbox cashier login.
- Password — the Checkbox cashier password. This is not the password for logging in to the Checkbox account, not the Skynum user password and not the QES password.
Tax groups
After saving the integration, open the API mapping tab and fill in the Tax groups section. For each Skynum tax, you need to select a Checkbox tax group.
If the tax group directory has not been loaded yet or tax groups in Checkbox have changed, click Load from Checkbox. The group list is pulled from Checkbox for the specific cash register, so after changing the cash register it needs to be updated again.
Select the group that matches the tax in Skynum and the settings of your Checkbox cash register. Tax codes do not need to be entered manually in the document: the tax of the line item is matched with the tax group specifically in API mapping.
If taxes have not yet been created in Skynum, configure them in Settings → Directories → Taxes.
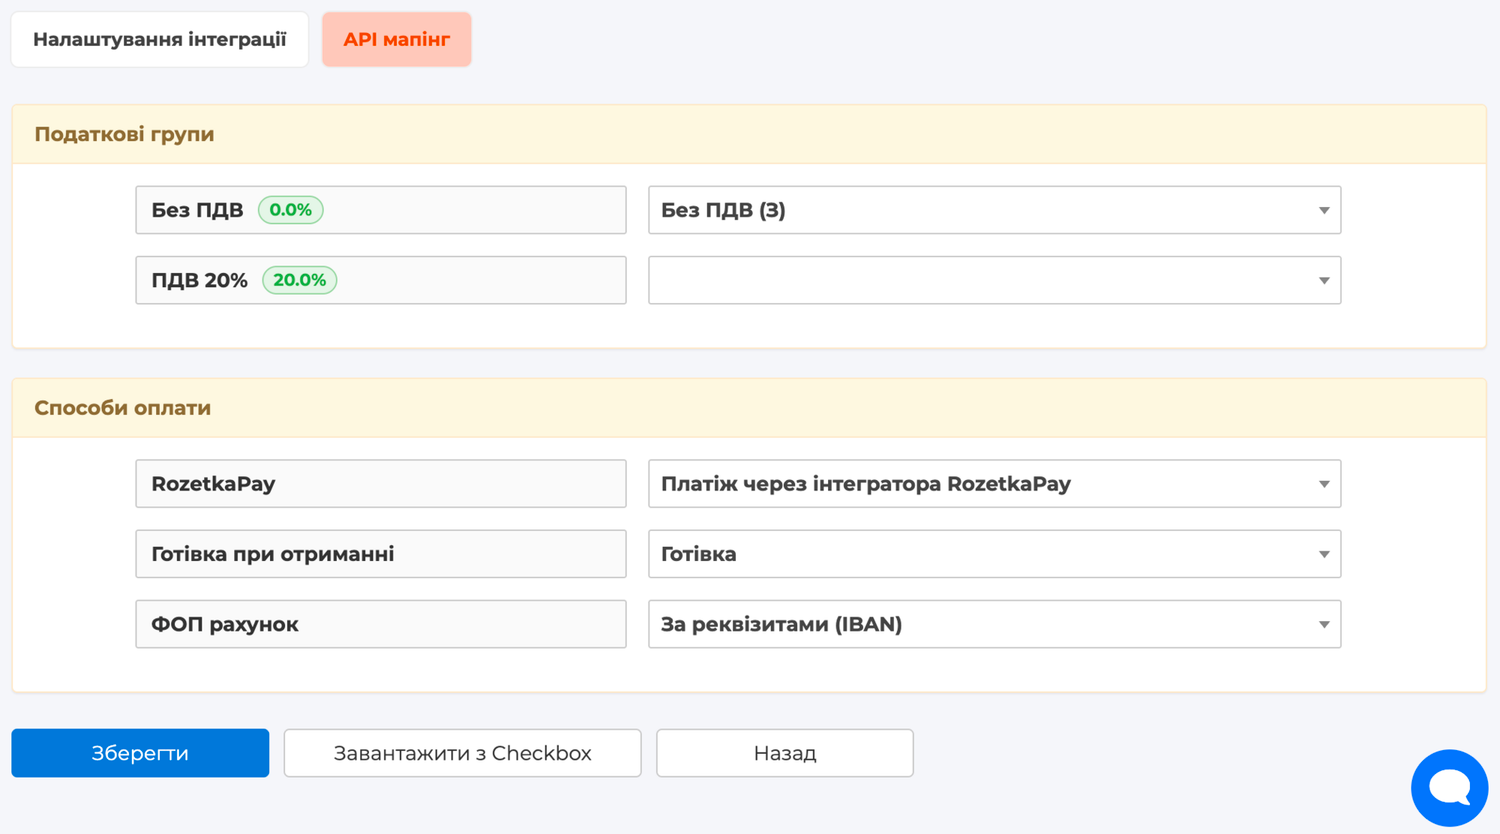
Payment methods
In the Payment methods section, map Skynum payment methods to Checkbox values for the fiscal receipt. In Skynum, payment methods are configured in Settings → Directories → Payment methods.
For Checkbox, the value is the text name of the payment type in the receipt. In the mapping field, you can select a standard value from the list or enter your own value manually if a separate payment type is used in Checkbox for your cash register.
The payment type in the fiscal receipt has tax significance. Before launching real receipts, check that each Skynum payment method is mapped to the correct Checkbox value.
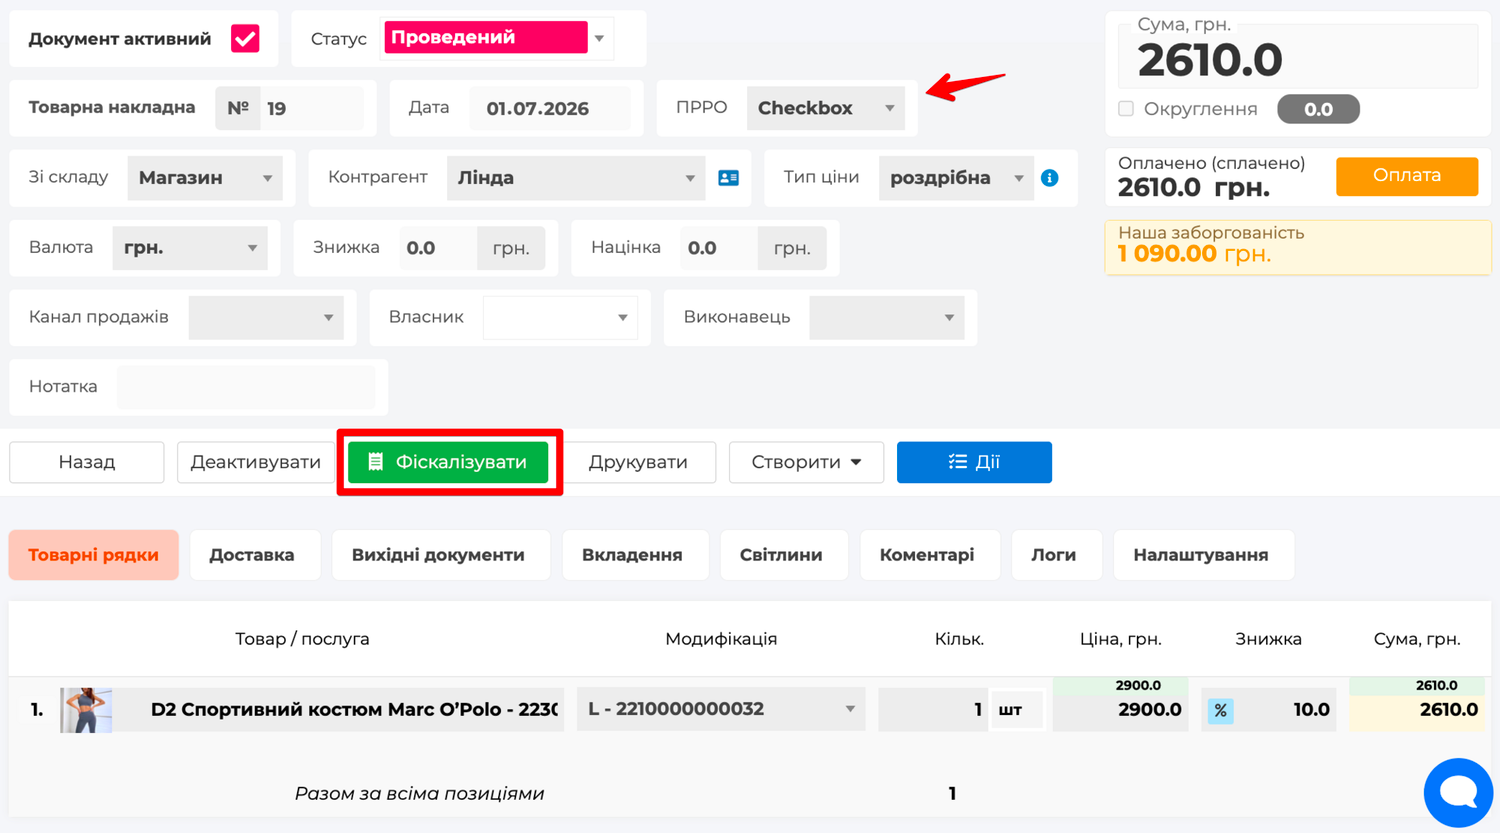
Fiscalizing a sales delivery note
A sale is fiscalized from a sales delivery note. Open Trade → Sales → Sales delivery note, create or open the document and check the main conditions before fiscalization.
- The document is activated.
- The document date matches the fiscalization day.
- The document currency is hryvnia.
- The document has filled line items, quantities, prices and taxes.
- A fiscal service is selected or automatically inserted for the document in the PRRO field.
- Tax groups and payment methods are filled in the integration API mapping.
After activating the document, click Fiscalize. During processing, Skynum sends the data to Checkbox, receives the result and shows the updated fiscalization status in the document. If the previous attempt ended with an error, open the Fiscalization not completed status and click Retry.
More about working with a sales delivery note is available in the corresponding Skynum help article.
How to open, print or send a fiscal receipt
After successful fiscalization, the Fiscalized status appears in the document or payment. Click it to open the fiscal receipt action menu.
- View receipt — opens the fiscal receipt in Checkbox. From this page, the receipt can be viewed and printed using the browser or receipt page tools.
- Copy — copies the fiscal receipt link so it can be sent to the customer manually.
- Send — opens the Send receipt to customer form. In the form, you can select Send SMS, Send email, check the customer's phone or email and click Send.
- Open in STS — opens the receipt in the State Tax Service if a separate STS link is available for this receipt.
To print, open the fiscal receipt through View receipt and print the Checkbox receipt page itself.
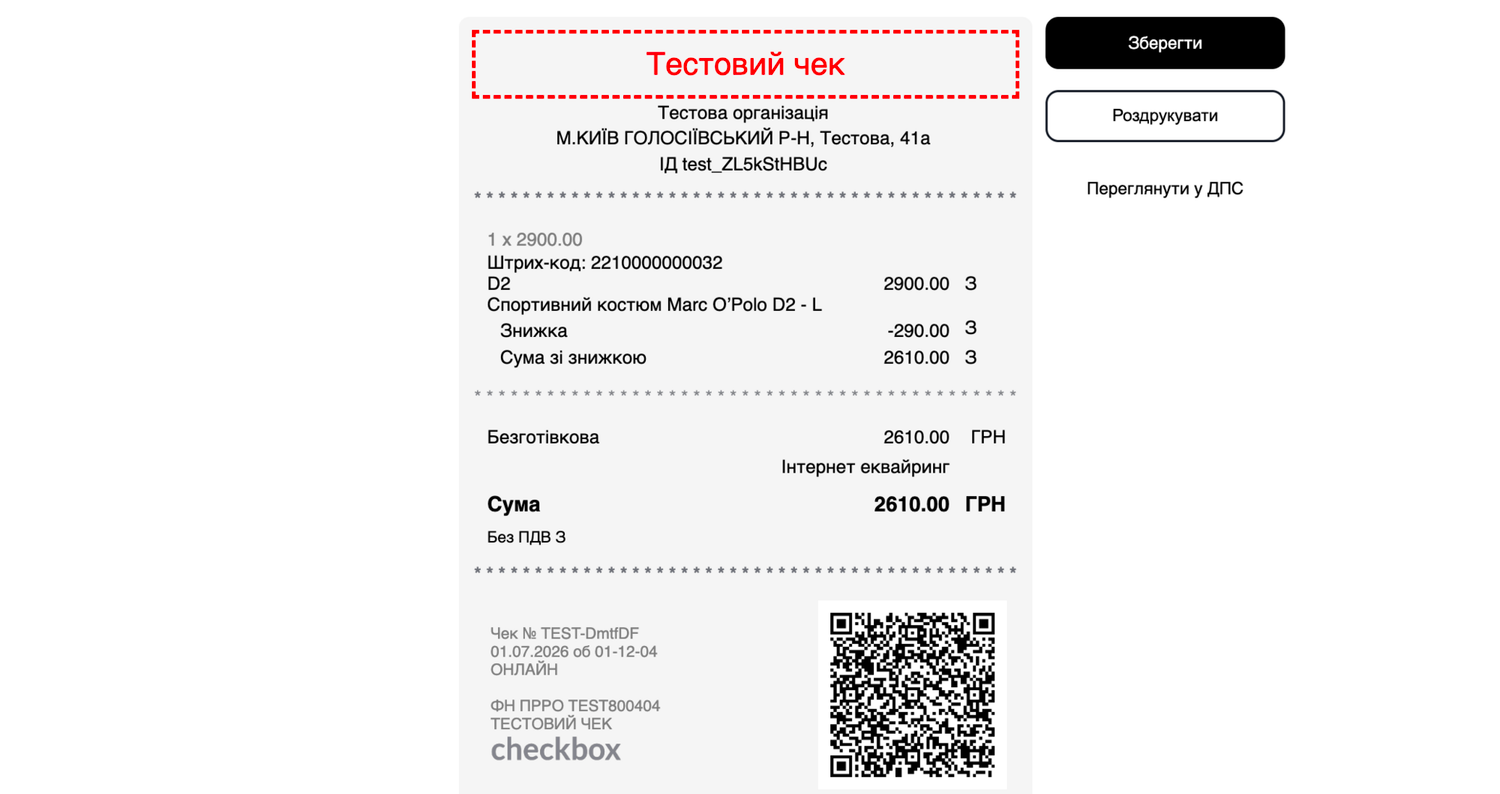
To send receipts via SMS, the company must separately order or enable SMS delivery directly in Checkbox. Skynum does not enable this service and does not send SMS through its own mailing: it only sends Checkbox the sending command for an already fiscalized receipt.
Returning a fiscal receipt
Checkbox in Skynum supports fiscal receipt returns by document. This is the scenario where you need to return a sale for a specific sales delivery note.
To make a return, open the sale, create a Sales return document, check the line items, amount, taxes, branch and PRRO, activate the document and start return fiscalization.
If the sale was part of a prepayment or postpayment chain, use fiscal chain scenarios. More details: prepayments, postpayments and fiscal chains.
More about sales returns is available in the corresponding Skynum help article.
Payment fiscalization
A separate payment can be fiscalized when the fiscal receipt must be created specifically based on the payment. This is used for payments in an order, sales delivery note or other scenarios where the payment is a separate part of the sales process.
Payments are opened in Finance → Cash desk or Finance → Bank. In the payment form, check the Payment method, Cash desk or bank account, Payment type, Branch, legal entity, Amount and currency. After activating the payment, start fiscalization if this payment must create a fiscal receipt.
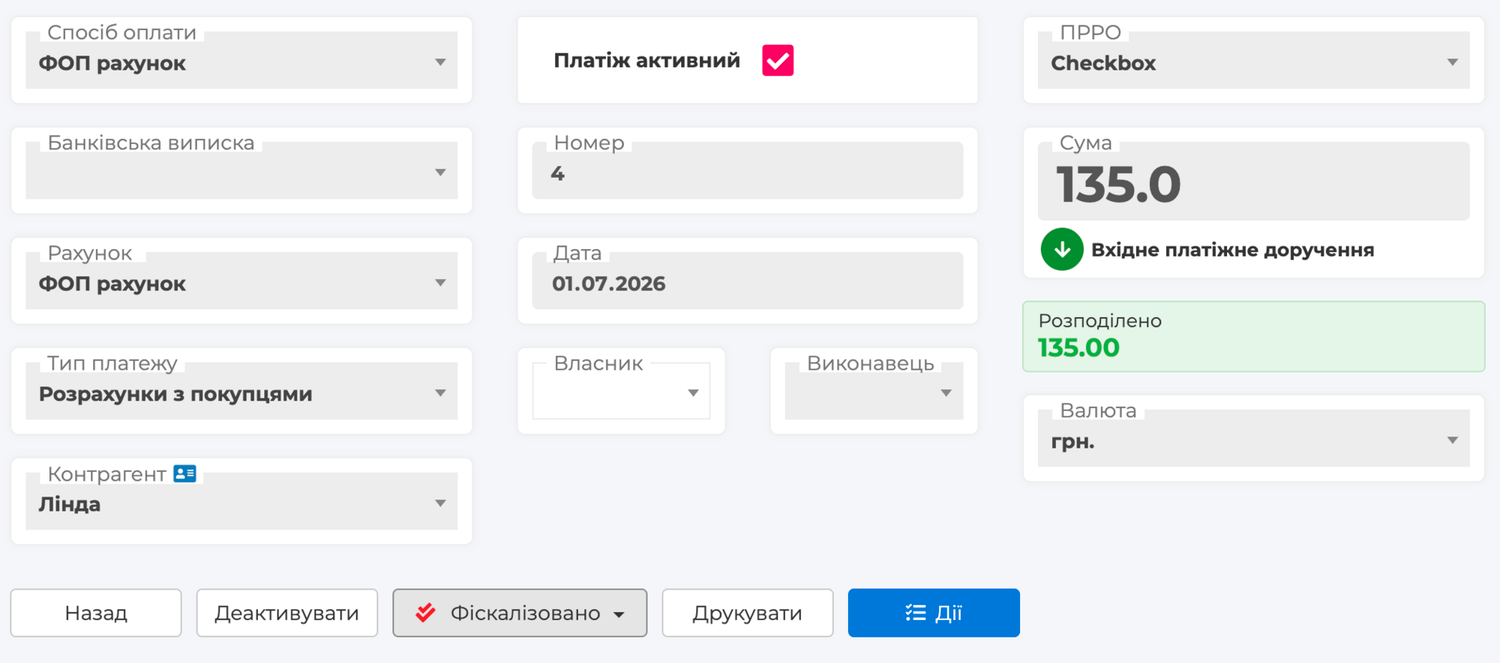
For payments, it is especially important to correctly map the payment method in the API mapping tab. This exact value is sent to the Checkbox fiscal receipt.
After successful payment fiscalization, the receipt actions are the same as in the document: open the Fiscalized status, view the receipt, copy the link or send the receipt to the customer.
More about payments and related payments is available in the corresponding Skynum help articles.
Prepayments, postpayments and fiscal chains
Checkbox is used in Skynum for scenarios where one sale is connected with several fiscal events: a prepayment, postpayment, installment payment or return of a related chain.
For the chain to work through Checkbox, all chain operations must use the correct fiscal integration, mapped tax groups and correct payment methods. The receipt creation sequence depends on the sales scenario, so configure it using the separate instruction: prepayments, postpayments and fiscal chains.
Automatic fiscalization of online orders
If sales come from an online store, fiscalization can start automatically according to the rules of the corresponding integration. In this scenario, Skynum creates the required documents or payments and fiscalizes them through the connected fiscal service.
For such operations to go through Checkbox, the automatic fiscalization rules must use this fiscal integration and the same tax and payment method mappings. More details: automatic fiscalization of online orders.
Nova Poshta cash on delivery
Nova Poshta cash on delivery is a separate scenario where it is important to correctly connect delivery, payment and fiscalization. If the company uses cash on delivery, first configure the Nova Poshta integration and payment creation rules.
More details: Nova Poshta cash on delivery.
Recommendations before launch
- Name integrations so it is clear which branch, legal entity and Checkbox cash register they belong to.
- Create a separate integration for each working cash register or branch if the company uses several cash registers.
- Do not use one cash register at the same time for different independent workplaces or systems if this causes shift or cashier conflicts.
- Before the first real sale, check the cash register license key, cashier login and password, receipt signing, taxes and payment methods on a test receipt.
- If you plan to send receipts via SMS, check that SMS delivery is separately enabled directly in Checkbox.
- Check that automatic shift closing at the end of the working day is configured in Checkbox.
- If the cash register or tax groups were changed in Checkbox, open API mapping and click Load from Checkbox.
- For prepayments, postpayments and full fiscal chain returns, first check the separate fiscal chain scenario.
Summary
To integrate Checkbox with Skynum, three key credentials are required: the cash register license key, cashier login and cashier password. Separately check that receipt signing is configured for the cashier in Checkbox. After connecting, fill in the API mapping of tax groups and payment methods, run a test document fiscalization and only then use the integration for real sales, payments, returns and fiscal chains.