While you have three employees, payroll fits in your head: a salary, an advance, the balance at the end of the month. But with the first sick leave, the first bonus and the first dismissal, questions appear that a simple Excel sheet cannot answer. How many days did the person actually work? How much have they already received? How much does the company owe the budget? And do these figures match what left the cash register and the bank account?
Skynum answers each of these questions. It takes worked days from the timesheet, which it builds from the work schedule. It deducts the paid advance from the salary itself. It calculates taxes at the rates from the directory and shows how much to pay to the budget. And every payout is a payment in the cash desk or the bank, so payroll figures and money always match.
The simple monthly rhythm: create the timesheet → pay the advance → mark leaves and sick leaves in the timesheet → calculate and pay the salary → pay the taxes. Each next step is possible only after the previous one, and Skynum will not let you mix them up.
This is the first article in the series on payroll in Skynum. We will go all the way from an empty company to the first paid salary, using a shop with four employees as the example: the administrator is on a monthly salary, the accountant is on a half-time salary, the cashier works in shifts and is paid per shift, the security guard is paid per hour. Details not covered here are in the other articles of the series: the timesheet, HR events, salary payment, pay per day and per hour, percentage of sales and piecework order from production.
What you will do every month
Once the employees are set up, a month of payroll is five steps:
- At the start of the month, create the timesheet. One click — and the month is filled with working days from the schedule.
- In the middle of the month, pay the advance. Create an advance statement: Skynum adds the employees to it and calculates everyone's advance. You do not need to calculate the monthly salary for this yet.
- During the month, mark in the timesheet who was absent. Leave, sick leave, absence — right in the timesheet; a bonus — as a separate document.
- At the end of the month, calculate and pay the salary. Check for each person how much is accrued, withheld and how much to pay out after the advance, confirm the calculation and create the payroll statement.
- Pay the taxes. Skynum creates a payment for each tax with the amount you owe the budget — you only activate it. After that the month is closed.
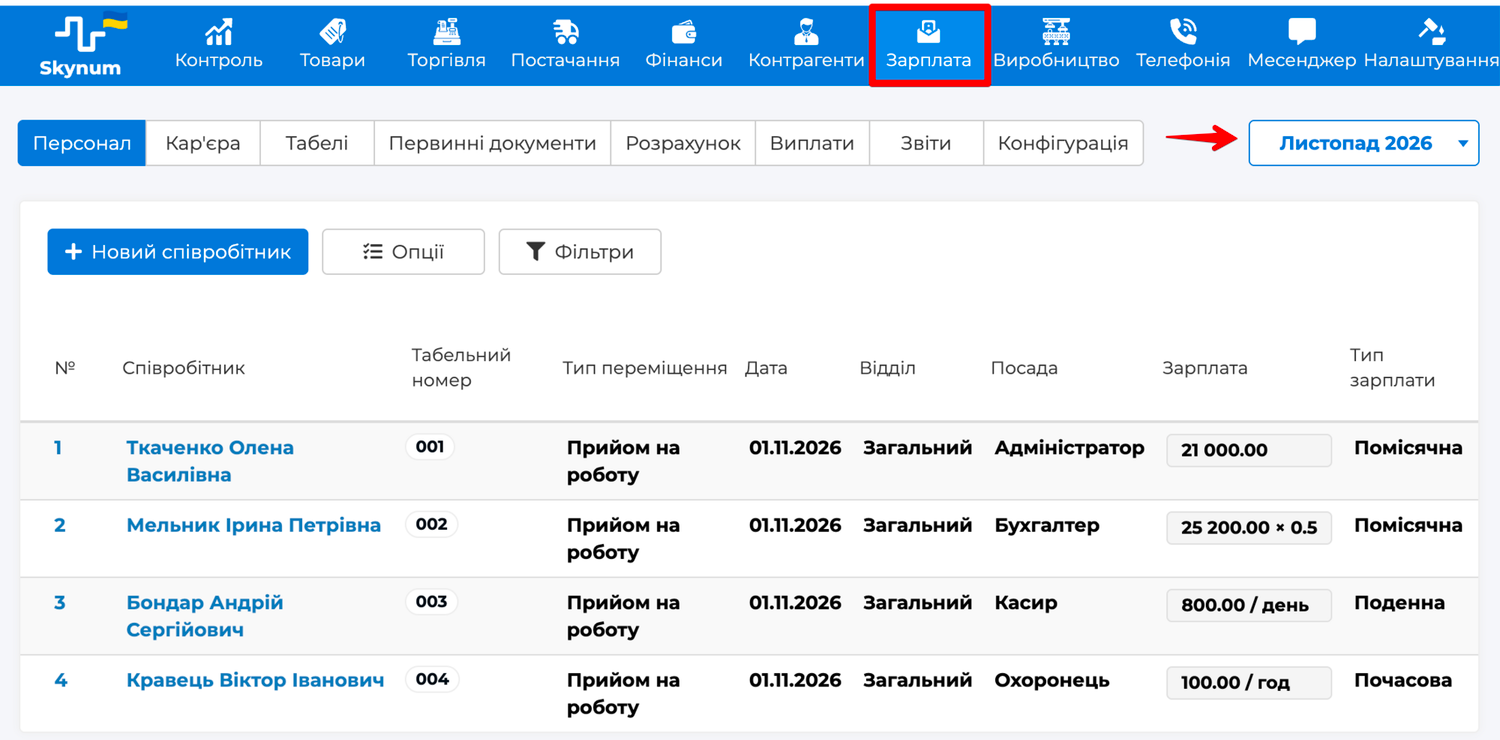
All of this happens in the Salary section. On the right in its header is the accounting month: the month you are working with now. Before the first step, select the month from which you start running payroll: the timesheet, documents and statements will go into it.
What is already set up
In a new company everything needed for payroll is already set up, and there is nothing to do with it now — go straight to the employees. What exactly is set up and what it is for:
- Work schedules — the schedule each employee works on; Skynum fills the timesheet from it.
- Cost item — the cost item the accrued salary goes to; thanks to it, salaries show up in the company's costs.
- Payroll taxes — the rates of personal income tax, military levy and unified social contribution (USC) that Skynum uses to withhold taxes and prepare payments to the budget.
- Advance method — how the advance is calculated: for the days worked from the 1st to the 15th, or as a percentage of the salary.
Step 1. Hire the employees
On the Personnel tab click New employee. Fill in the last name, first name and patronymic, tax number and personnel number.
Under the HR heading are the working conditions:
- Start Date — the day from which Skynum calculates this person's salary.
- Job Position — pick one from the list. If the one you need is missing, add it in Configuration → Job titles.
- Department — a new company has one department, so the field is not in the form, and that is the simplest way: one statement for everyone. Departments are needed only if you want to pay salaries separately per unit — but then every department has its own statements every month, and there is more work. If you really need this, add them in Configuration → Departments, and the field appears.
- Cost item — a new company has one cost item for payroll, «Заробітна плата» (salaries), so the field is not in the form: all salaries go to it. Several items are needed only if you want to see, say, salespeople's and administration's salaries separately in your costs. Then add them in Settings → Terms → Costs, and the field appears.
- Work Schedule — the schedule the person works on; Skynum fills the timesheet from it. In our shop the administrator and the accountant work Monday to Friday — «П'ятиденний тиждень, 8 годин» (five-day week, 8 hours) suits them. The cashier works in shifts, every other day — «Позмінно, 8 годин» (shifts, 8 hours); the guard works 2 days on, 2 days off, 12 hours each — «Позмінно, 12 годин» (shifts, 12 hours). In shift schedules all days are working days, and days off are marked in the timesheet.
- Payment Type — how the base pay is calculated: "Monthly" — a salary per month, for an incomplete month a part of the salary for the days worked; "Daily" — pay for each day worked; "Hourly" — pay for each hour worked; "Piecework" — no base pay.
The payment type defines only the base pay. A percentage of sales and piecework orders from production are additional accruals, and anyone can have them: the administrator on a salary, the cashier on daily pay. "Piecework" is chosen only when there is no base pay at all and the person earns only on sales or piecework orders. How to set up the percentage and the orders is described in the articles Percentage of sales and Piecework order from production.
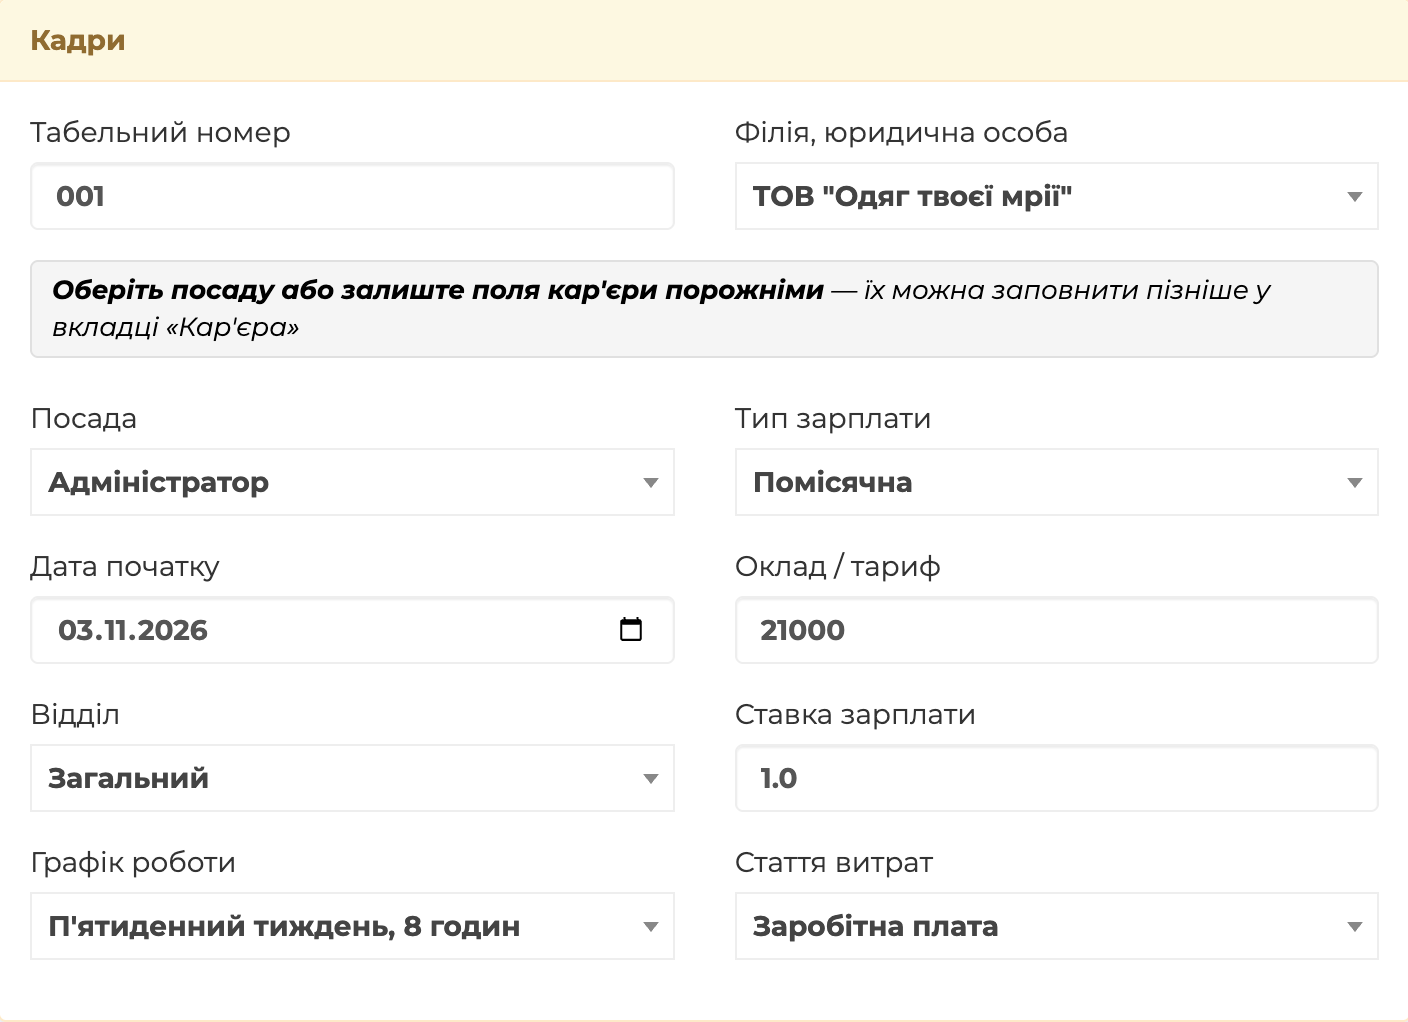
So, for the administrator choose Monthly and enter the salary, for example 21,000. For the accountant — Monthly as well, salary 25,200 and Salary Rate 0.5: she works half-time. For the cashier — Daily and 800 per shift. For the guard — Hourly and 100 per hour. From here on, all steps are the same for everyone; what is special about shift work and hourly pay is in the article Daily and hourly pay in Skynum.
Skynum keeps the working conditions as a separate dated record — the employee's career. If the conditions are not known yet, leave the fields under the HR heading empty and add the record later on the Careers tab with the Add career move button. A raise, a transfer or a dismissal is also a new record, not an edit of the old one; how to record them is in the article HR events in Skynum.
Below, under the Payroll calculation heading, is how to pay:
- Payment Method — in cash or non-cash. It determines which statement the employee goes to: the cash one or the non-cash one.
- Bank for salary and IBAN — for non-cash: with them the statement is sent to the bank as a file.
- % of accrual of sick leave — what percentage of the average earnings the person receives per day of illness; it depends on the length of insured service, the accountant provides the value.
Save. The first record — Recruitment — appears in the employee's career with everything you entered. Set up the rest the same way.
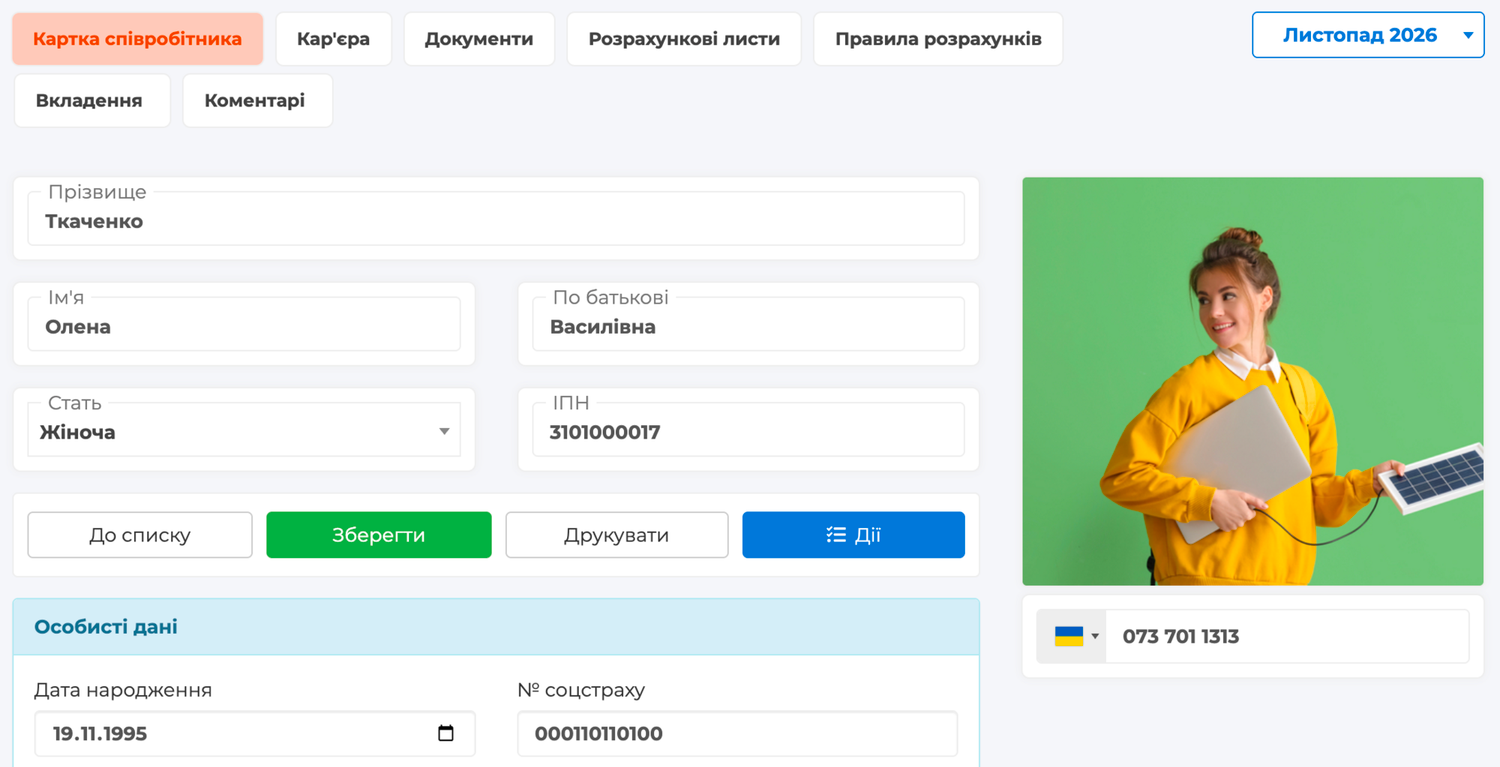
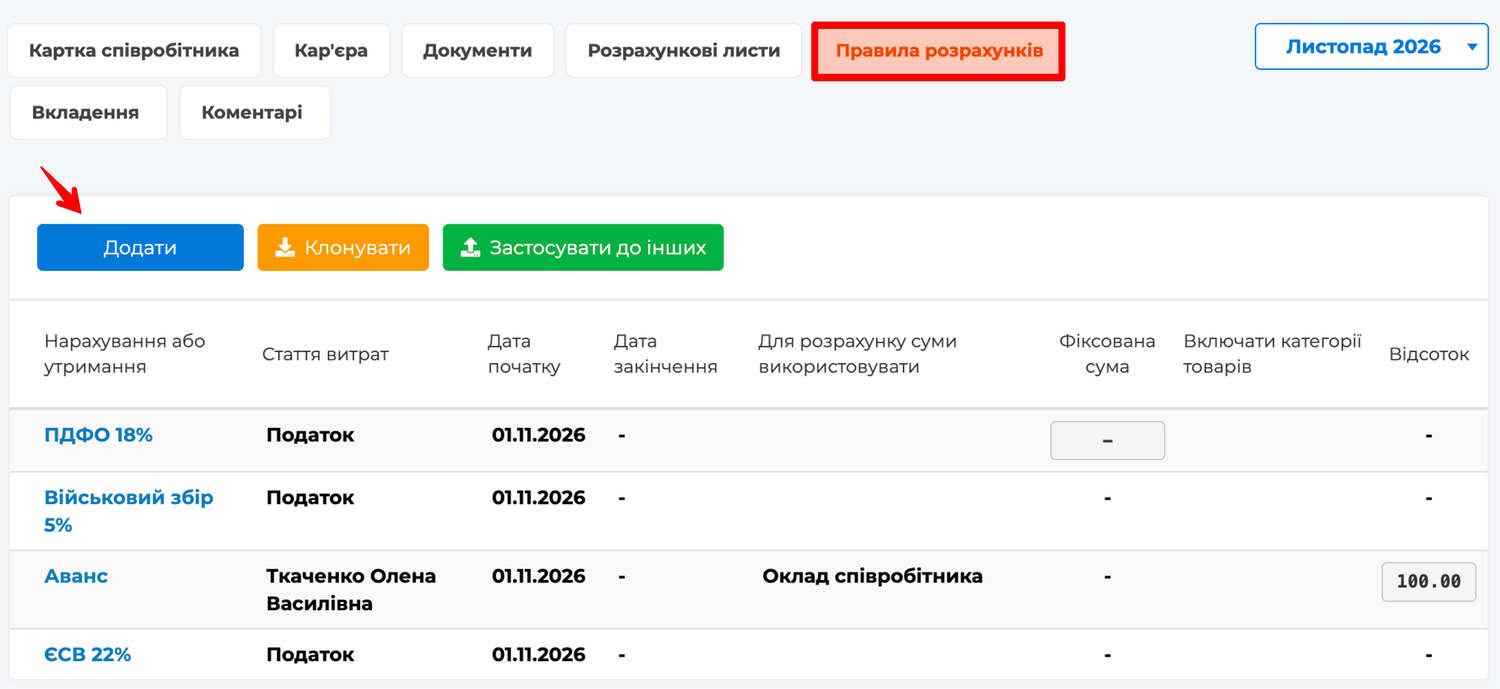
Together with the card, Skynum adds four calculation rules to the employee (the Payrolls tab): «ПДФО 18%» (personal income tax), «Військовий збір 5%» (military levy), «ЄСВ 22%» (USC) and «Аванс» (advance). Thanks to them, this person's taxes and advance are calculated right away — the same for a salary, a shift or an hour.
Calculation rules define what exactly is accrued or withheld for each employee. The system has all the rules you need, and you configure them yourself. Say, a writ of execution for alimony arrives for the cashier: click Add, choose Аліменти (alimony), specify the recipient, and take the base and the percentage from the writ — for example 25% of the accruals after deductions. From the next calculation the deduction is made automatically. When the deduction ends, set the End Date in the rule or delete it. All rules and their fields are described in the help article Calculation rules.
Step 2. At the start of the month, create the timesheet
Check the accounting month, open Timesheets and click Create. In the window leave the period as the whole month, specify the legal entity, and leave the department and employee empty — the timesheet is created for everyone at once. Click Confirm.
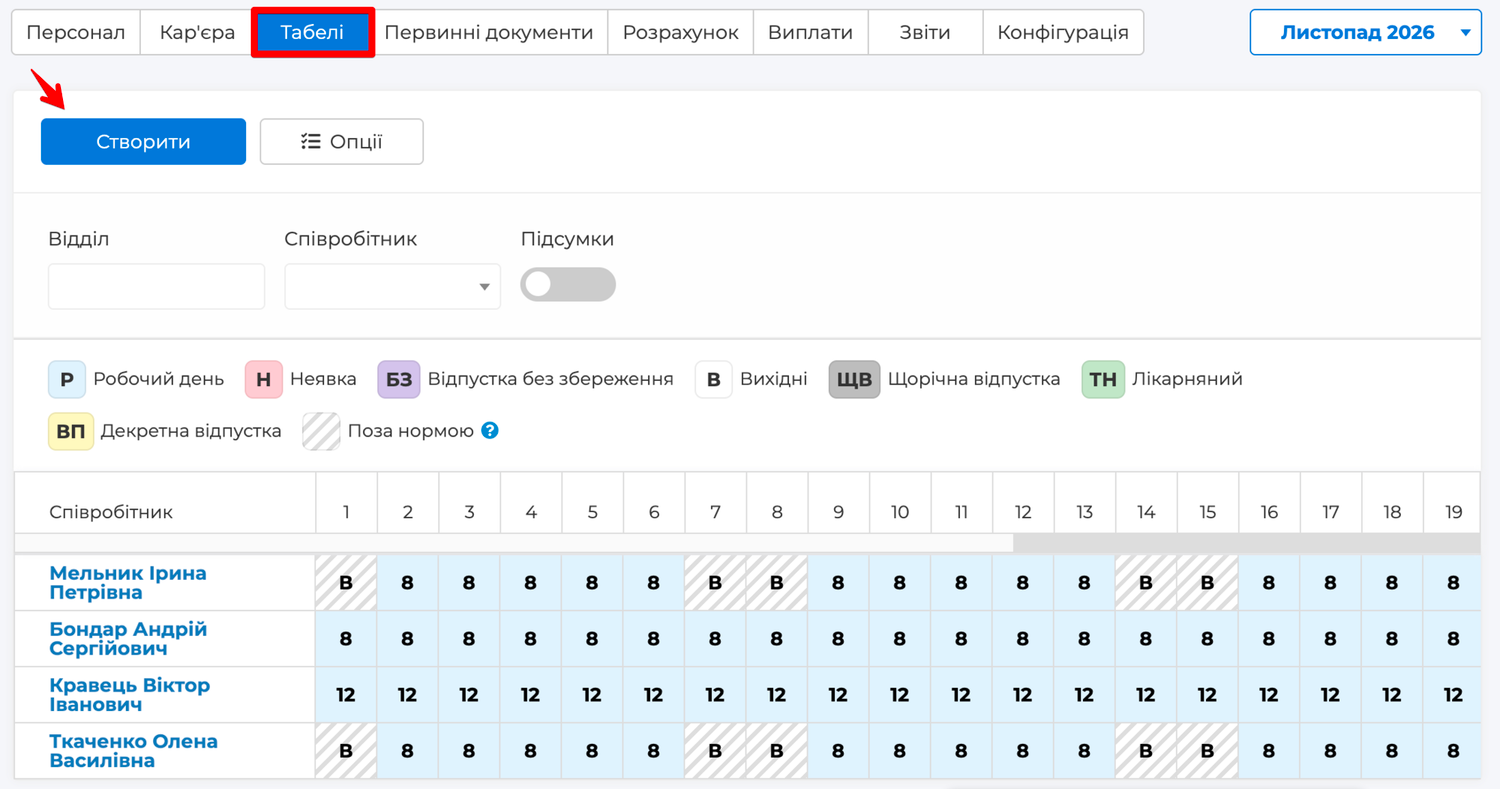
Here is the timesheet: next to each employee are all the days of the month, working days already show the hours from the schedule, days off are marked with the letter O. At the same time, on the Paysheets tab a monthly calculation has appeared for everyone — empty for now.
For the cashier and the guard on shift schedules all days are still working days — mark their shifts. Click any day next to the cashier's name: a panel of buttons appears above the selected day. Click Month pattern, choose the "Every other day" pattern, specify the First working shift and click Apply — the days between shifts become days off.
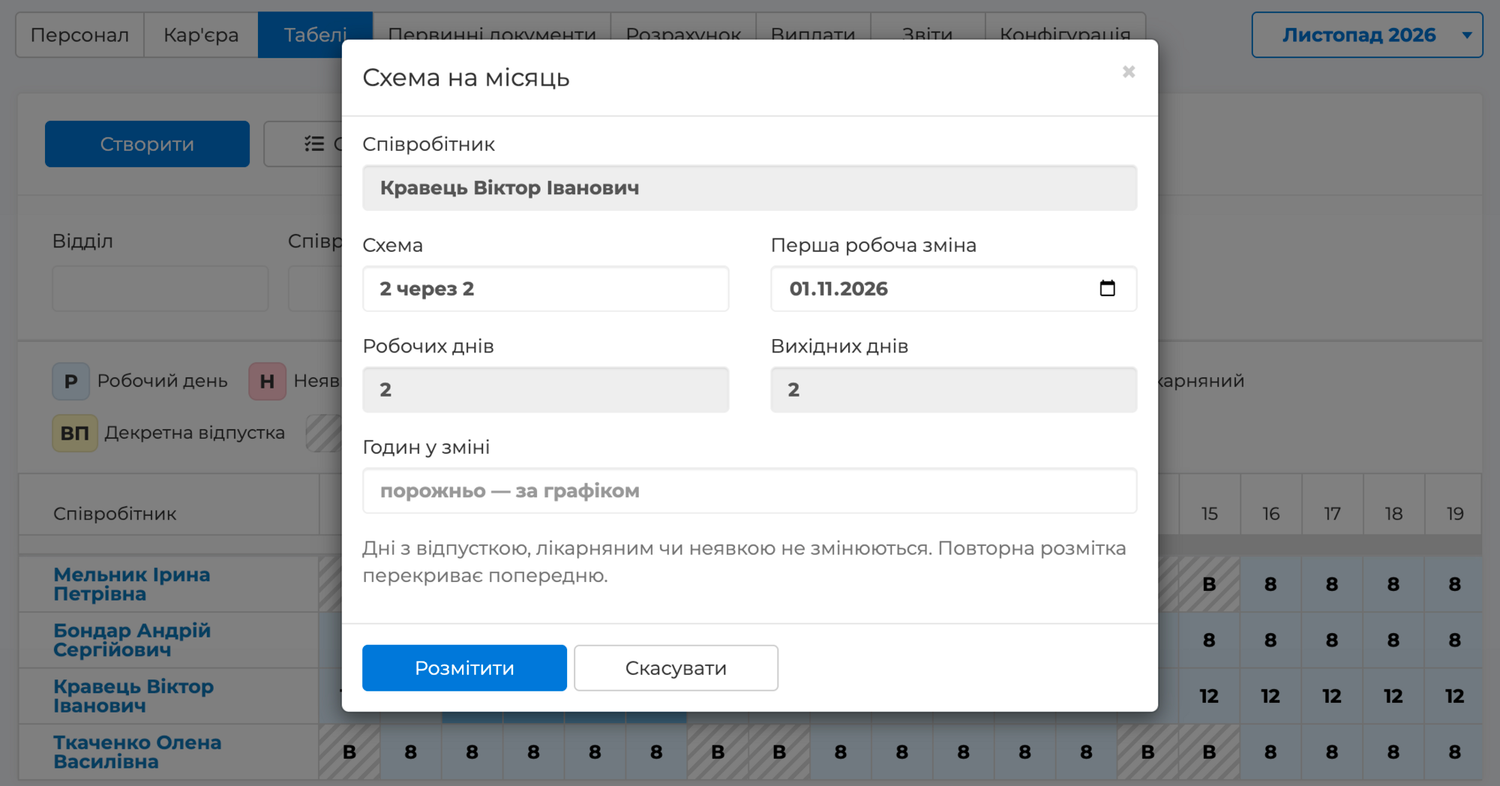
Mark the guard the same way with the "2 on / 2 off" pattern. If someone came in outside their shift, select those days and click Working day or Weekends on the panel.
The guard is paid for hours, and they are already there from the schedule — 12 per shift. If a shift turned out longer or shorter, click that day, click Hours worked on the panel, enter the actual hours and save.
During the month, mark who was absent
The timesheet is not filled in by hand: it is already ready from the schedule. You only mark the days when the person was not at work. Select the needed days next to the name with the mouse (for one day just click it) and click on the panel what kind of days they were:
- Annual leave or Sick leave — a window opens asking for the Day Price: the average daily earnings, which the accountant calculates under the average salary rules (why Skynum does not calculate it itself is explained in the timesheet article). For sick leave there is also the Percentage — it is already filled from the employee's card. Click Save.
- Unpaid leave or Absence — apply immediately: these days are simply not paid.
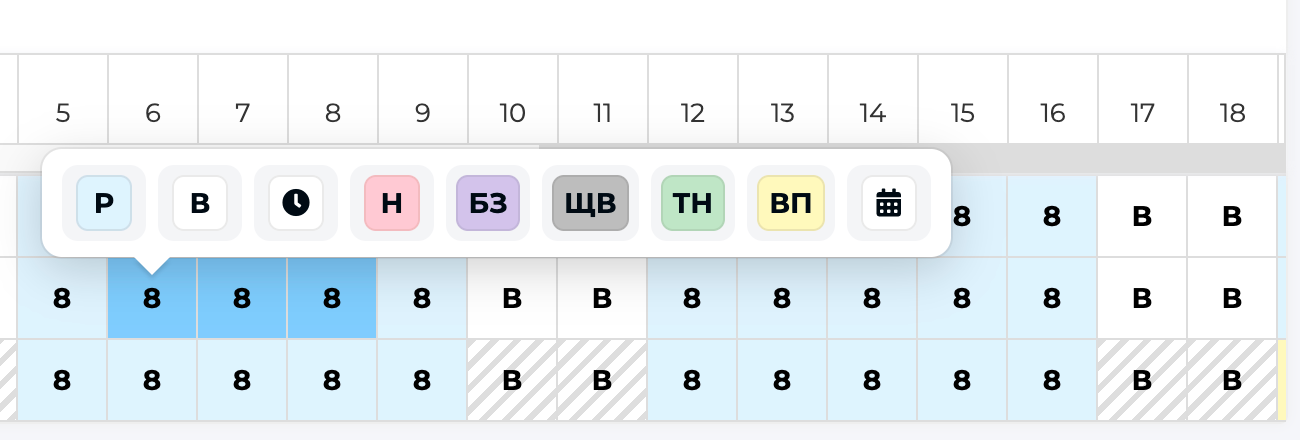
Skynum creates the corresponding document — leave, sick leave or absence — and includes it in payroll right away. In the timesheet, instead of hours, these days show marks: AL — annual leave, SL — sick leave, UL — unpaid leave, AB — absence. The document itself, with its number, dates and amount, is on the Primary documents tab; you can print it from there.
Say, one of the employees was ill for three days. You select those days next to their name, click Sick leave and enter a day price of 900. The monthly calculation shows a separate «Лікарняні» (sick pay) accrual for three days, and the base pay for the remaining days. There is no need to recalculate it by hand.
Before the calculation it is convenient to switch on Totals: for each employee you see how many days they worked in the month.
A bonus or a one-off extra payment is not about working time, so it is recorded with a Payroll order document. On the Primary documents tab open Payroll order and click New Document. In the document choose the Премія (bonus) accrual and click Fill in — all employees are added to the document. Enter the amounts and activate it.
Everything about the timesheet — maternity leave, absences, part-time days, leave that spans two months — is collected in the article The timesheet in Skynum.
Step 3. In the middle of the month, pay the advance
On the Payrolls → Advance statements tab click Create statement.
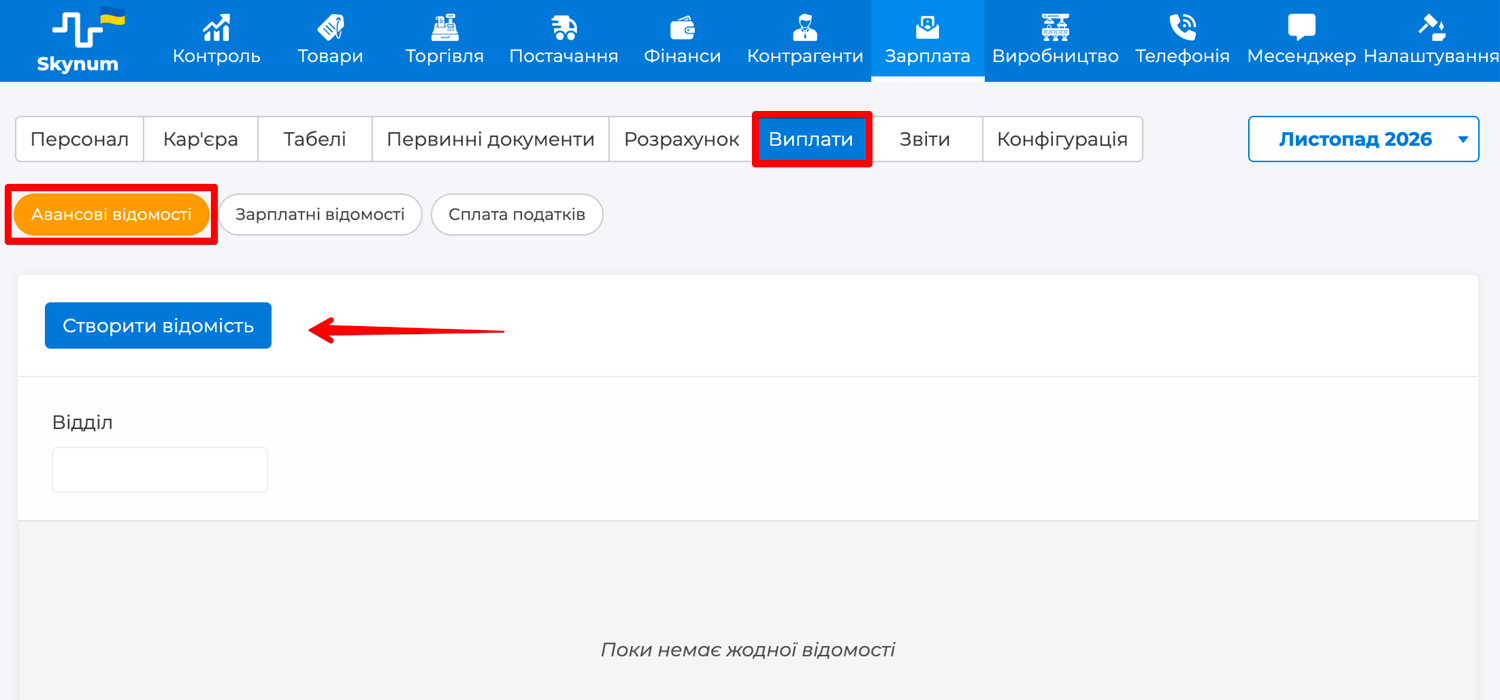
Specify the legal entity, the statement date and the payment date, the payment method and, depending on it, the bank account or the cash desk. Save. Skynum adds to the statement all employees paid this way — in cash or to a card — and calculates everyone's advance as the salary for the working days from the 1st to the 15th.
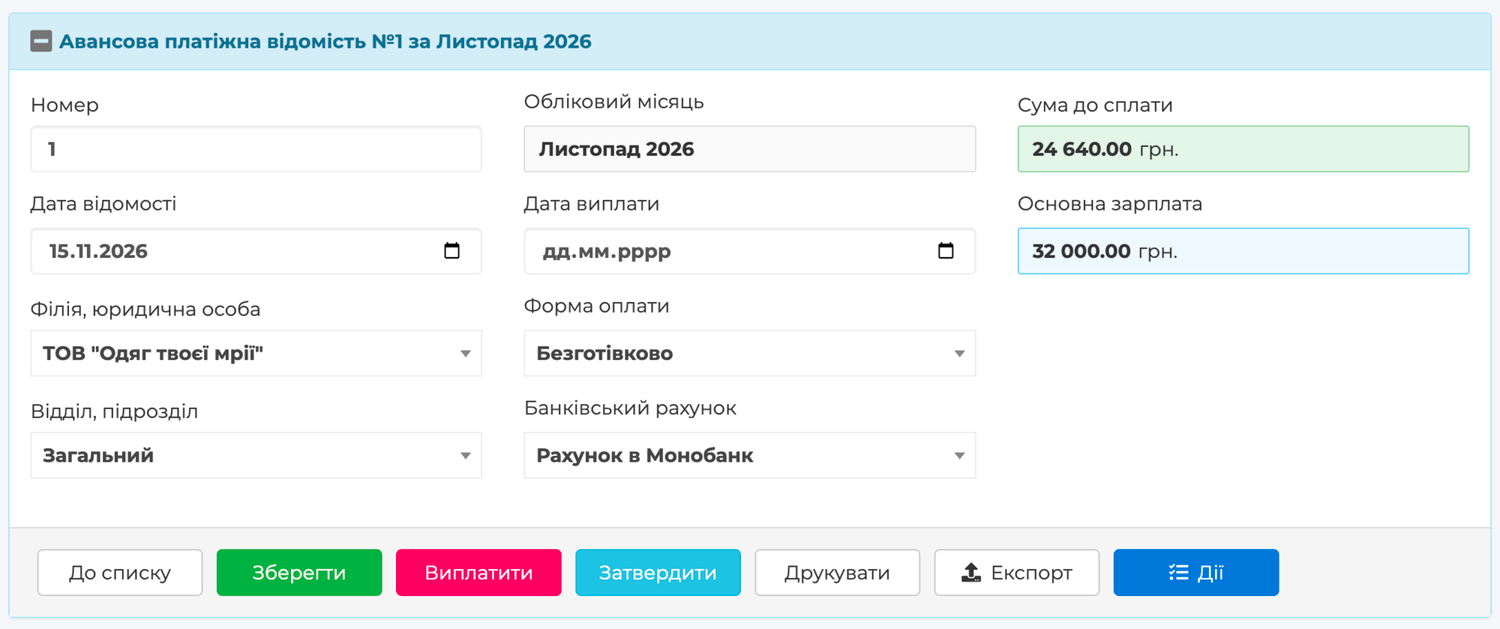
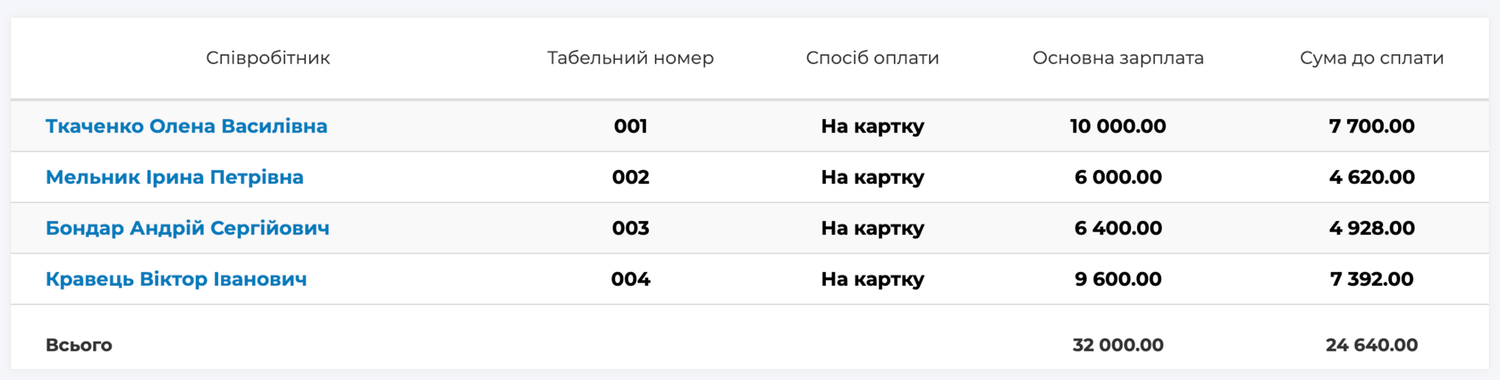
In November there are 10 working days out of 21 from the 1st to the 15th. For the administrator with a salary of 21,000 the statement shows: accrued 10,000, income tax 1,800, military levy 500, Amount to be paid 7,700. For the half-time accountant — accrued 6,000, income tax 1,080, military levy 300, to be paid 4,620. The cashier works every other day, so from the 1st to the 15th he has 8 shifts: accrued 8 × 800 = 6,400, income tax 1,152, military levy 320, to be paid 4,928. The guard works 2 on, 2 off, so from the 1st to the 15th he has 8 shifts of 12 hours: accrued 96 × 100 = 9,600, income tax 1,728, military levy 480, to be paid 7,392. Check the amounts.
If you hand out the money right away — click Pay. If the statement first goes to the cashier or to the bank — click Approve: the fields are locked from editing, and you click Pay once the money has been paid out. The payout appears as a payment in Finances → Cash desk or Bank, and in the monthly calculation the advance is shown as already paid.
In our shop everyone is paid to a card, so there is one statement — with all four. If you pay someone in cash, those employees get a separate, cash statement — with the cash desk instead of the account; if you have departments, there is also one statement per department. The Export button produces a file in your bank's format.
Taxes on the advance are paid on the day of the advance, so right after paying go to Payrolls → Tax payment and click Create payments — how it works is described in step 5.
Advance methods, bank files, paying a single person with a cash order and debts at the turn of the month are described in detail in the article Salary payment in Skynum.
Step 4. At the end of the month, calculate and pay the salary
Open the Paysheets tab and click Calculate. Skynum takes the worked days from the timesheet, leaves and sick leaves from the documents, taxes from the calculation rules and the paid advance — and shows for each person how much is accrued, withheld and how much to pay out. Switch on Payroll details to see every accrual and deduction separately.
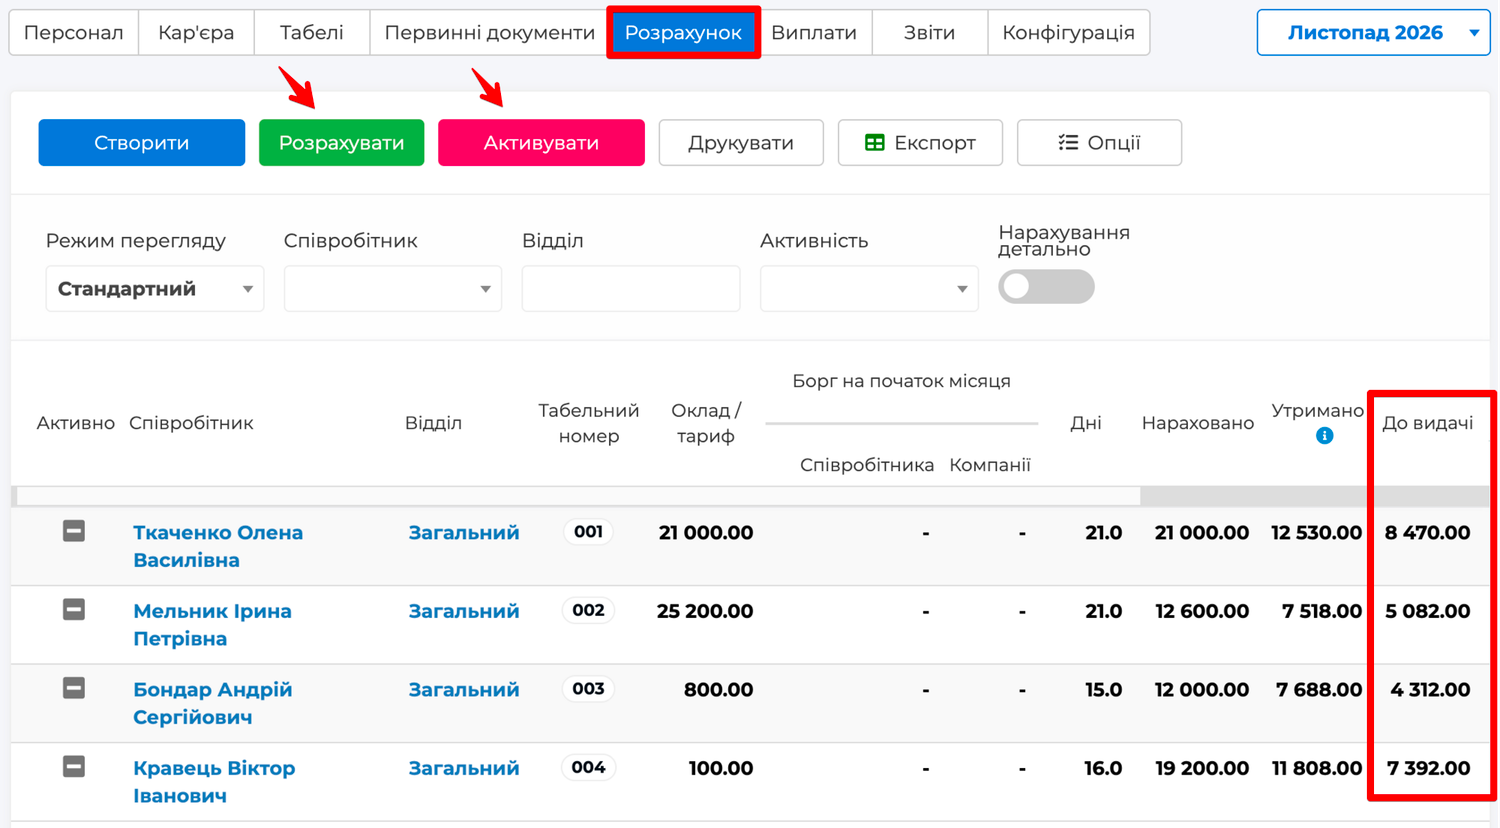
Here is the calculation for the full month:
- Administrator: base pay 21,000.00 for 21 working days; income tax 18% — 3,780.00, military levy 5% — 1,050.00; advance 7,700.00 already paid; To be issued — 8,470.00; USC — 4,620.00.
- Accountant: base pay 12,600.00 (half of the 25,200 salary); income tax — 2,268.00, military levy — 630.00; advance 4,620.00; To be issued — 5,082.00; USC — 2,772.00.
- Cashier: base pay 15 shifts × 800 = 12,000.00; income tax — 2,160.00, military levy — 600.00; advance 4,928.00; To be issued — 4,312.00; USC — 2,640.00.
- Guard: base pay 16 shifts × 12 hours = 192 hours × 100 = 19,200.00; income tax — 3,456.00, military levy — 960.00; advance 7,392.00; To be issued — 7,392.00; USC — 4,224.00.
The USC is paid by the company on top of the salary, so in the calculation it is shown separately and is not deducted from the amount to be issued.
Clicking a name opens that person's calculation in detail: every accrual and deduction, the month's documents and the timesheet by day.
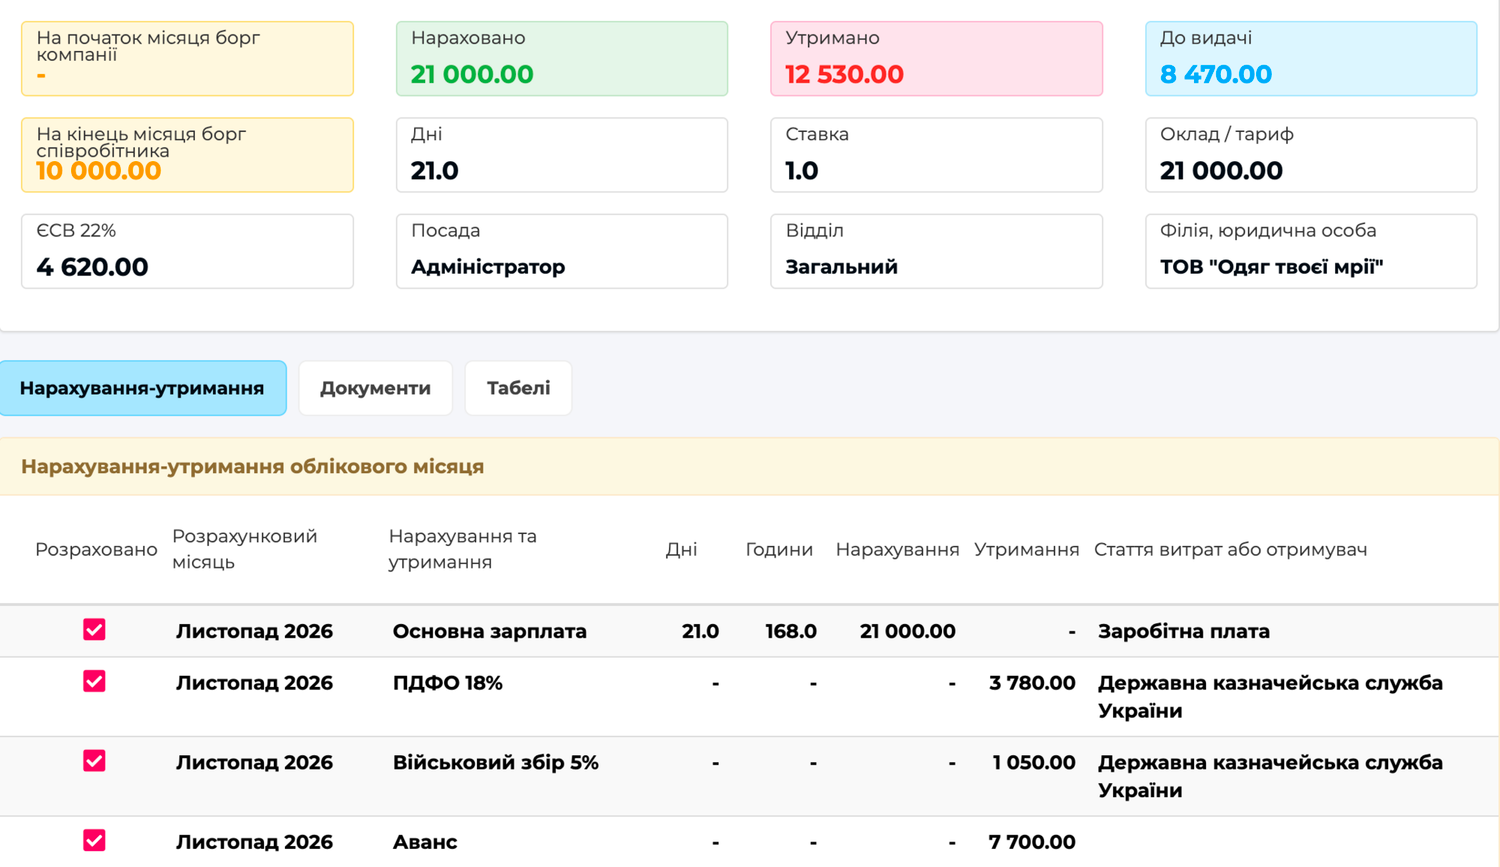
If something does not add up, fix the cause — the document, the rule or the timesheet — and the calculation updates as soon as you open Paysheets again.
When everything adds up, click Activate — the calculation is confirmed. The timesheet and documents for this month are now locked from changes (to fix something you will have to cancel the confirmation), and the To be issued amount has become the company's debt to the employee — it is shown as Debt at the end of the month.
Payroll statement
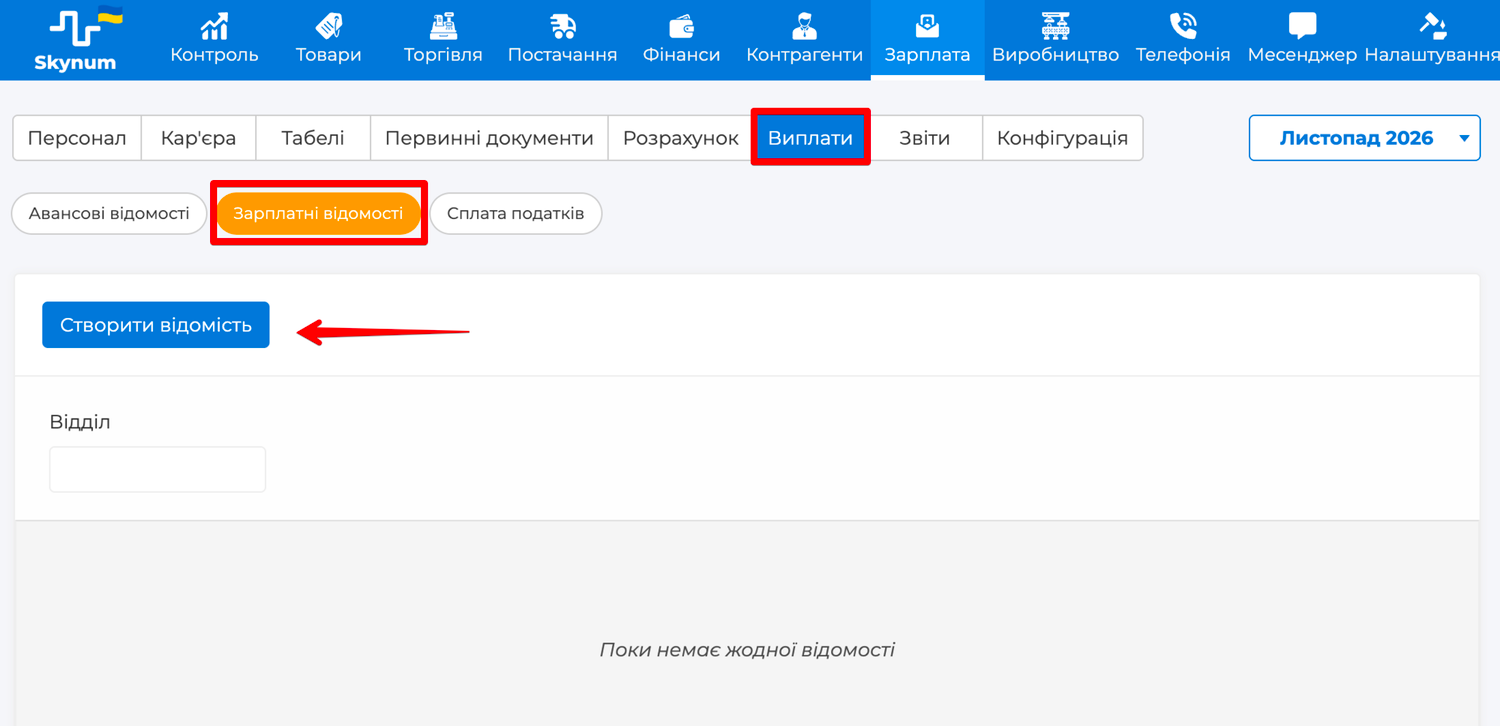
Once the calculation is confirmed, open Payrolls → Payroll Payment Statements, click Create statement and fill in the same fields as in the advance statement.
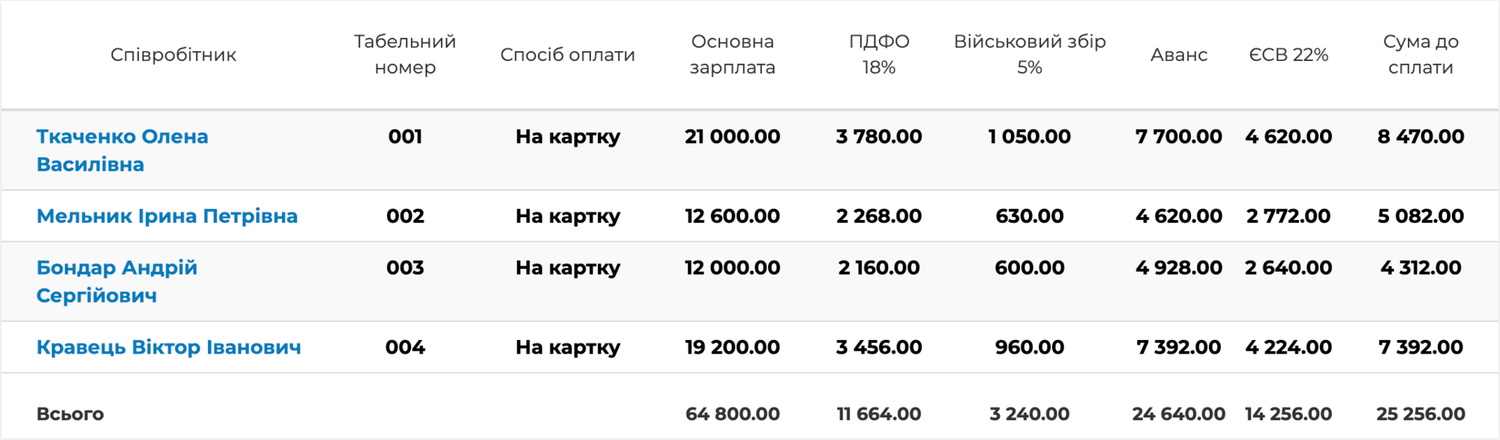
The statement includes the employees with the selected payment method, and the amounts come from their calculations: To be issued minus what has already been paid. In our shop the statement shows: administrator 8,470, accountant 5,082, cashier 4,312, guard 7,392. Then, if needed, Print the payment statement with a signature column or Export it for the bank — and Pay; if time passes between printing and paying out, first Approve. The payout, like the advance, appears as a payment in Finances → Cash desk or Bank.
After the payout, the Paysheets tab shows that the salary has been paid and the company's debt to the employee is closed. If you pay November's salary on 5 December, select November in the section header and create the statement for it with a payment date of 5 December: the debt moves to December as Debt at the beginning of the month and is closed there. This is a normal situation, not an error.
Step 5. Pay the taxes
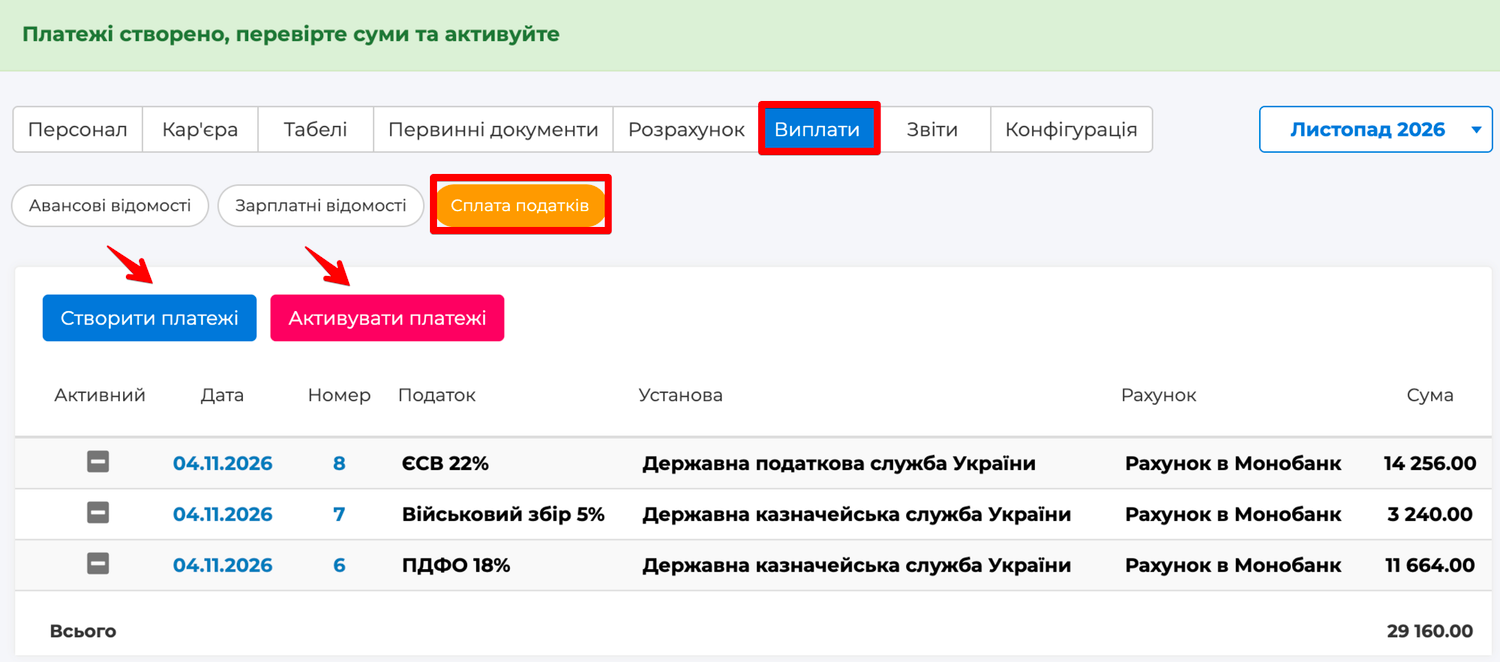
Skynum creates the tax payments itself. Open Payrolls → Tax payment and click Create payments. In the window choose the account you pay from and click Create — three outgoing payments appear in the list: for income tax, military levy and USC, each with its recipient institution, today's date and the amount the budget expects for all confirmed calculations. Check the amounts and click Activate payments. The same after every payout: the payment amount is everything the budget expects as of today minus what has already been paid, so after the advance and after the salary the taxes are paid in two rounds. The amounts are easy to check against the calculation: income tax and military levy are the employees' deductions, USC is the separate amount next to each of them.
Before moving on to the next month, open Salary → Reports → Turnovers. The report shows, in four lines — taxes, mandatory payments, USC and salaries to employees — how much the company owed at the start of the month, how much it accrued and paid during the month and how much it still owes at the end. If everything is paid out and paid within the month, there are no debts at the end. The month is closed. A new month starts the same way: select it in the Salary section header, create the timesheet — and then the same steps as this month.
What else the module can do
This is the basic path — it is enough for a company that pays a salary, per shift or per hour. The module can do much more; read the article that applies to your business:
- The timesheet. What the marks in the timesheet mean and how to record leave, sick leave, maternity leave, absence or a part-time day — right in the timesheet or as a document. What to do when a leave starts in one month and ends in another.
- HR events. How to record a raise, a change of position, a transfer to another department and a dismissal with the final settlement, what to do when a person comes back, how to import employees from Excel and copy rules to a whole department.
- Salary payment. Three advance methods and when to choose which. How a statement goes from draft to payout. A bank file in the Privat24, Ukrsibbank, Pumb or iBank2 format. Paying a single person with a cash order. What the employee's and the company's debts at the turn of the month mean. Tax payment and the Turnovers report.
- Daily and hourly pay. 2 on / 2 off shift patterns, pay per hour, actual hours in the timesheet, switching from a salary to daily pay.
- Percentage of sales. How to accrue a cashier or a manager a percentage of the receipts and invoices they issued — for selected product categories, for the current or the previous month. The "Percentage of sales" report for reconciliation.
- Piecework order from production. Piece rates, product costing, a work order from a production document and splitting the amount between workers by the labour participation ratio.
Everything else — alimony, copying calculation rules to a whole department, importing employees from Excel, step-by-step instructions for every screen and the reference of system messages — is collected in the Payroll and HR section of the help centre.
Before the first payout
A short checklist so that the first month goes without rework:
- The accounting month selected is the one you are calculating.
- Every employee has a start date, payment type, schedule and payment method, and for non-cash — the bank and IBAN.
- If the company does not work on public holidays, they are marked as days off in the schedule (Configuration → Graphs).
- The timesheet is created and the shifts are marked before you enter leaves and sick leaves and pay the advance.
- The advance is paid before the calculation is confirmed, the payroll statement is created after.
Summary
Payroll in Skynum is a full calculation, not a calculator. Four payment types and any combination of them, a timesheet from the schedule with shifts by pattern, leaves and sick leaves in one click, an advance for the days worked, taxes and ready payments to the budget, payment statements with a bank file — and all of it in the same accounting as your cash desk, bank and financial reports. Set the conditions for each employee once — then every month it is the same five steps, and everything in between Skynum calculates itself and shows where every figure comes from.