
Prom.ua is a well-known Ukrainian marketplace where you can also create and manage your own online store. With it, buyers find, choose and order products in your store and on the marketplace online.
The Skynum platform has everything needed for integration with Prom. Once connected, Prom and Skynum exchange data: products, prices and stock balances go to the marketplace from your accounting, and orders and messages from Prom buyers come into Skynum. You get full inventory accounting, order management and chat with Prom buyers in Skynum.
What the Prom Integration Gives You
- Availability on Prom matches the stock in the warehouse. A product that has run out in the warehouse gets the "out of stock" status with the next update, so there are fewer cancellations and the store's rating grows.
- Prom orders without manual entry. Skynum loads every order with its products, buyer, delivery and amount.
- The buyer sees the status of their order. You change the status in Skynum — and it is updated in the buyer's account on Prom.
- Automatic payment and fiscal receipt. For an order paid through Prom, Skynum creates a payment and issues a fiscal receipt.
- Chat with Prom and Bigl buyers in Skynum. Buyers' questions arrive in the Messenger section, and you reply while seeing the stock balances and the buyer's orders.
- How much Prom earns. Reports show the revenue from sales on Prom, the cost of goods sold and the profit.
- All sales channels in one accounting. On Prom, Rozetka, Kasta and in an online store on Horoshop or WooCommerce, you sell from the same stock.
To create an account on Prom, sign up on the official website prom.ua. If you already have one, just log in to your seller account.
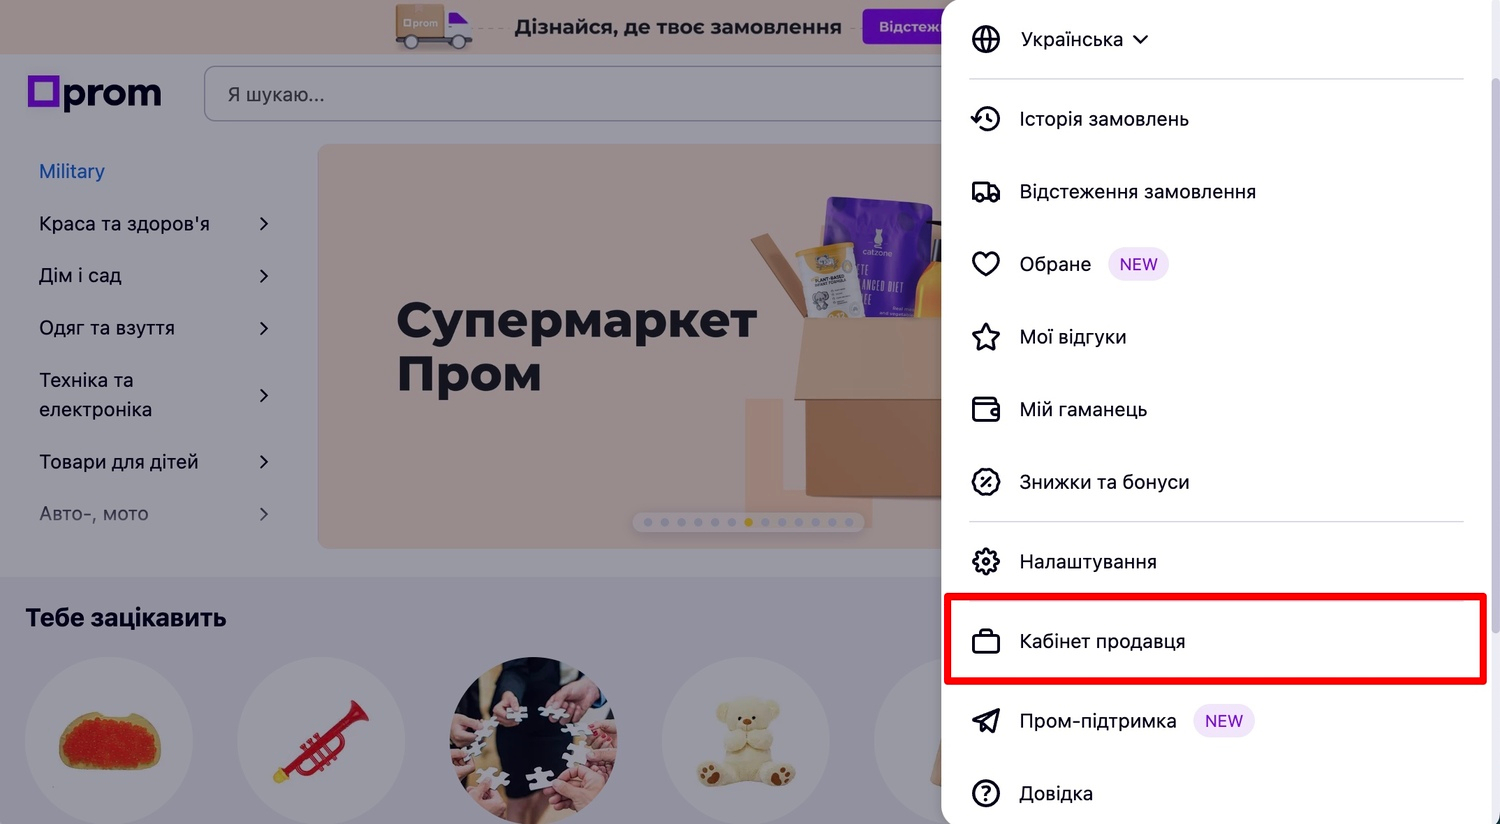
Here is what you need to do to connect Prom:
- Create a token in your Prom account.
- Connect Prom in Skynum.
- Set up the product upload.
- Start the product import in your Prom account.
- Set up order loading.
- Check a test order.
- Connect the Prom chat.
Now let's go through each step in detail: what to open, what to fill in and how to make sure everything works.
Prom's seller account is available only in Ukrainian. Below, the names of its sections, fields and buttons are given in Ukrainian, as on the Prom screens, with an English translation in brackets.
Creating a Token in Your Prom Account
Log in to your seller account on Prom, open Налаштування (Settings) and the Управління API-токенами (API token management) tab.
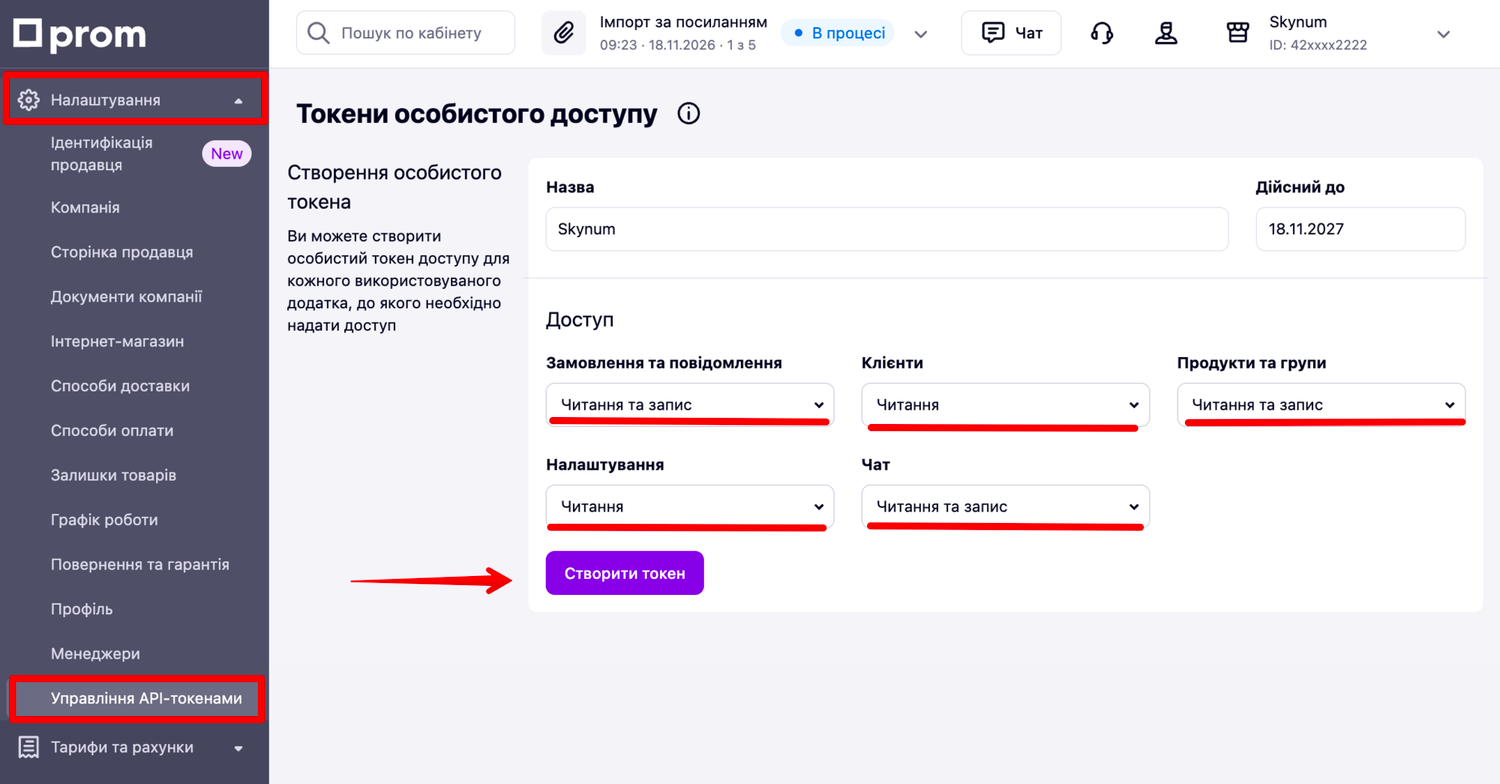
In the Створення особистого токена (Create a personal token) block, enter a name, for example Skynum. In the Дійсний до (Valid until) field, Prom already sets a date one year ahead — this is the longest token term. When Prom reminds you that the term is ending, create a new token and paste it into every Prom integration.
In the Доступ (Access) block, choose for each group:
- Замовлення та повідомлення (Orders and messages) — Читання та запис (Read and write).
- Клієнти (Clients) — Читання (Read).
- Продукти та групи (Products and groups) — Читання та запис (Read and write).
- Налаштування (Settings) — Читання (Read).
- Чат (Chat) — Читання та запис (Read and write): then the same token will also work for the Prom chat.
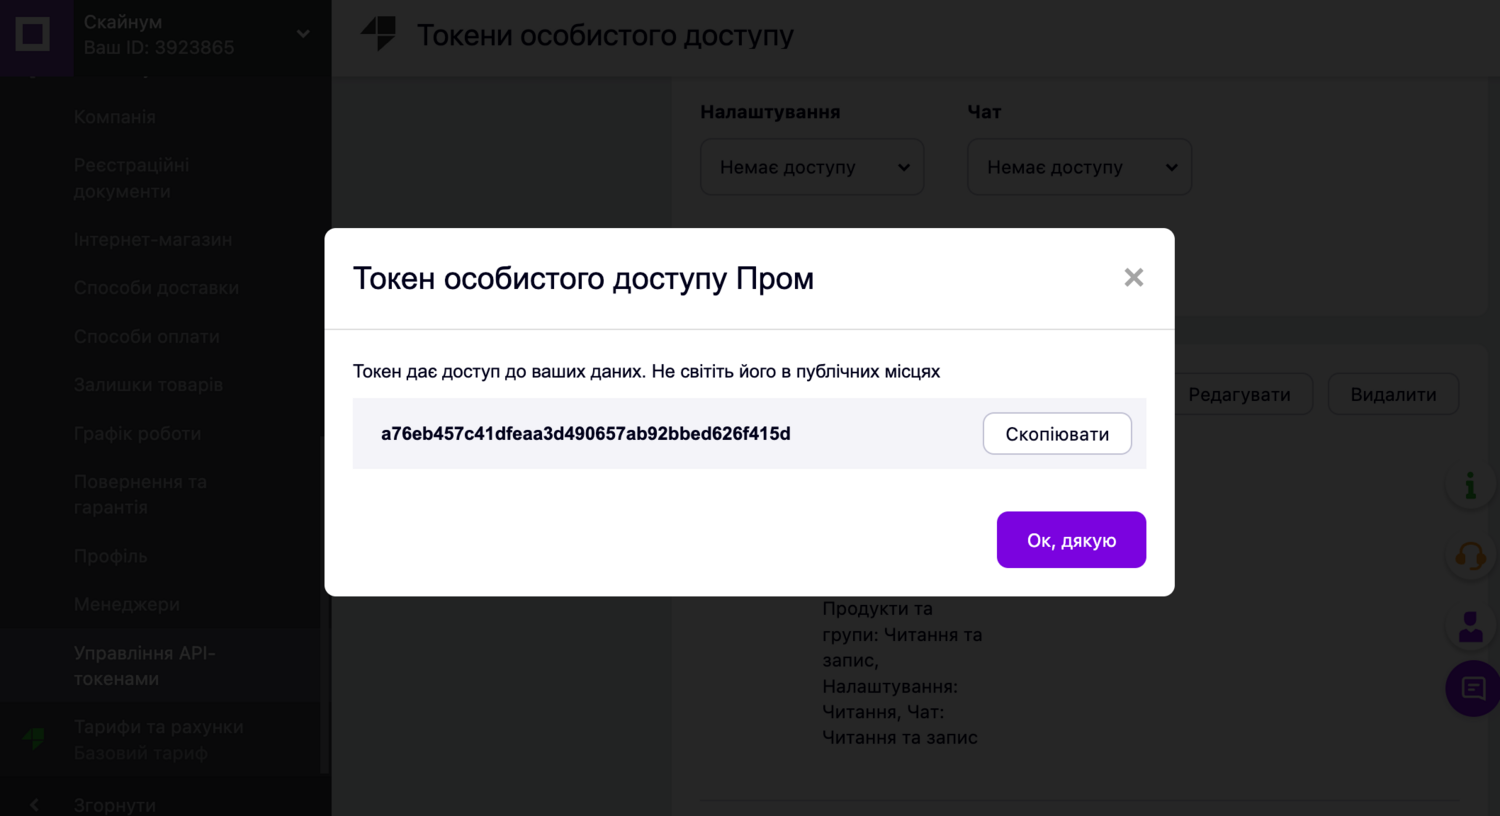
Click Створити токен (Create token). The token appears in the Активні токени особистого доступу (Active personal access tokens) list: click Дивитись (View) next to it and copy the value.
Connecting Prom in Skynum
The token is ready — now go to Skynum. In the platform, open Settings → Integrations → Online Stores, click Add Integration and choose Prom in the list.
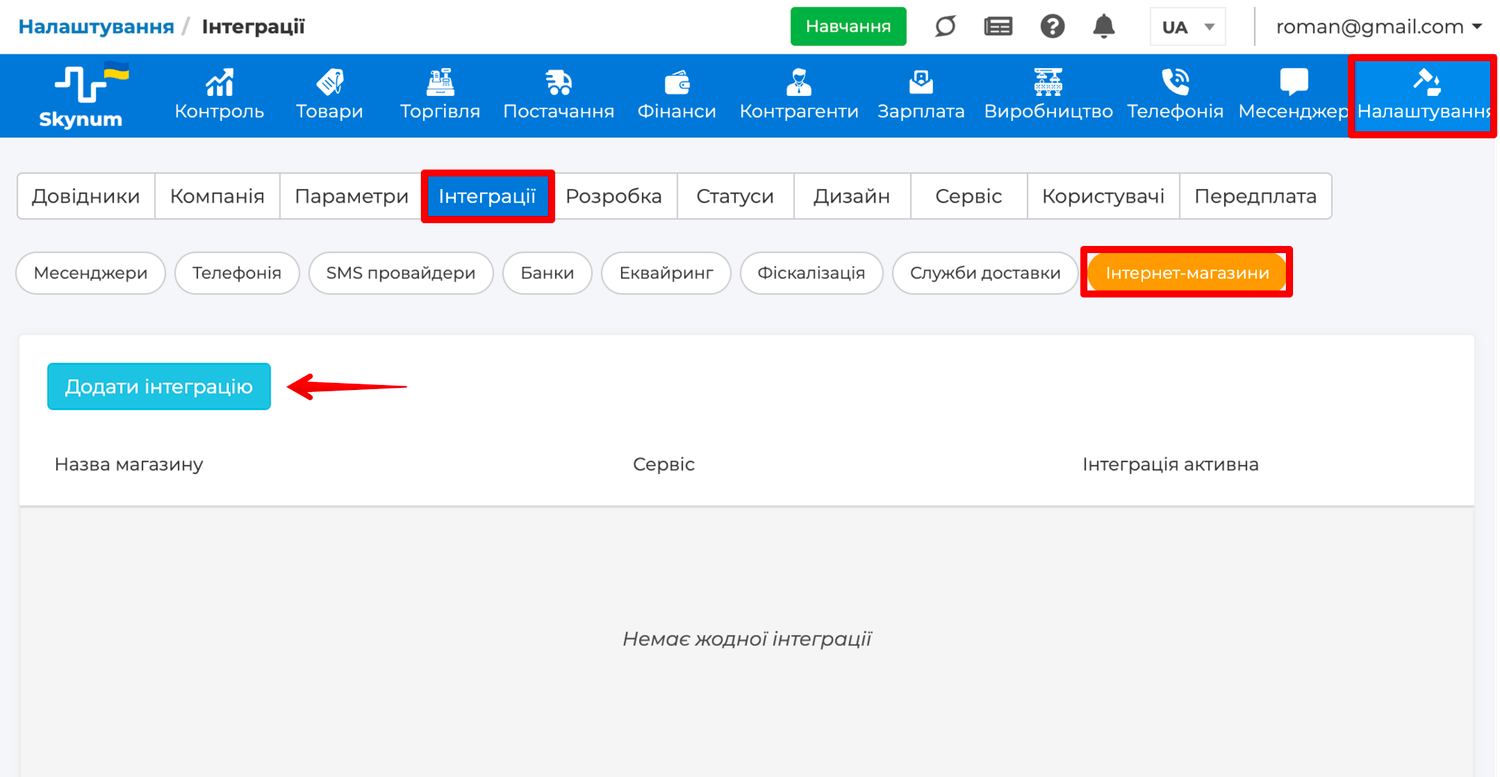
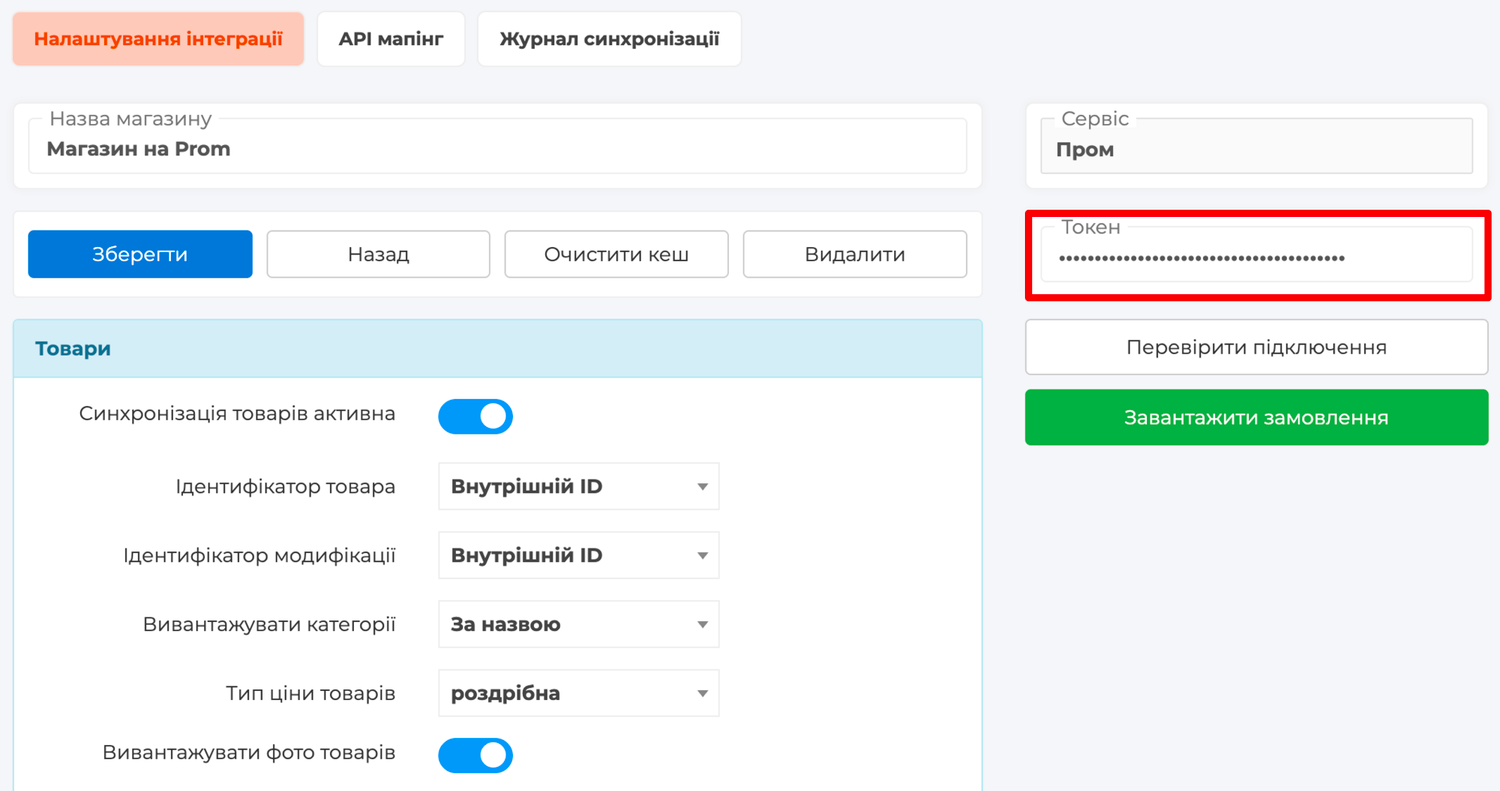
The form for a new integration opens. In the Shop Name field, enter a name by which you will recognize the integration in the list, and paste the copied token into the Token field.
Click Save — the Check Connection button appears in the integration. Click it — Skynum shows the message Connection successfully verified. If an error appears instead, copy the token again and check in your Prom account that Читання та запис (Read and write) is selected for the Замовлення та повідомлення (Orders and messages) group.
Uploading Products to Prom
Products get to Prom as a file that Skynum updates every hour and after every save of the integration. To turn on the upload, select Product Synchronization Active in the integration's Goods block.
Next, choose what gets to Prom and how:
- Item ID — Prom recognizes your item by it; the options are Internal ID, External ID, Code or SKU. What to choose is explained below, in the section "How to Link Skynum and Prom Products".
- Modification ID — the same for product variants: sizes, colors, volumes.
- Upload Categories — By name: Prom creates the same groups and subgroups as the categories in Skynum.
- Product Price Type — the price the buyer will see on Prom. If you have separate prices for the marketplace, create a pricing type for them and choose it here.
- Upload product photos — turn it on: Prom gets up to ten photos of each product from its card.
- Unload goods without residues — turn it on: a product that has run out in the warehouse stays on Prom with the "out of stock" status and becomes available again when it arrives in the warehouse.
- Marketplace description — (optional) turn it on if a separate description for marketplaces is filled in the product cards: Prom gets it instead of the main one.
- Name of modifications — how Prom will name a variant. Product with modification adds the modification name to the product name, Duplicate product name keeps only the product name.
- Exclude Categories and Only products from the category — (optional) to upload only part of the catalog to Prom.
- Warehouse balances only — (optional) the warehouses whose stock balances Prom uses to show availability. If you ship Prom orders from one warehouse, choose it.
- Only products with types — (optional) what to upload: goods, products, services, bundles.
- Upload languages — choose UA and RU: Prom gets names and descriptions in Ukrainian and Russian from the product card.
Before importing to Prom, check that each product has a description and a category: without them, Prom will not create the item.
For features to get to Prom, on the API mapping tab, in the Features block, enter next to each needed feature its name on Prom in the product's category. Features with an empty field are not uploaded.
Feature names are visible in your Prom account on the product page: choose a category in the Категорія на маркетплейсі (Category on the marketplace) field — and its features appear in the Характеристики категорії (Category features) block. The full list is given by the Експорт характеристик (Export features) button in the Товари та послуги → Категорії (Products and services → Categories) section.
For products with variants, in the Modifications block, next to the feature by which they differ, enter its name on Prom — the buyer chooses the size or color by it. Save the integration.
Note: for Skynum modifications to work on Prom as variants of one product, you may need to connect the Різновиди (Variants) app in your Prom account. Check the terms of connecting it with Prom support.
How to Link Skynum and Prom Products
Prom recognizes each product by an identifier — a number that Skynum passes in the file together with the product. Skynum takes this number from the field you chose in Item ID. If Prom already has an item with this number, Prom updates its price, availability and description. If there is no such item, Prom creates a new one.
That is why what to choose in Item ID depends on where you start. There are two options: your store on Prom is still empty, or you already sell on Prom and your products are there. Find your option below.
Important. Do not change the selected identifier after the first import of products to Prom by link: for Prom, a product with a new identifier is a new item, and the catalog on the marketplace will be duplicated.
Option 1. Your Store on Prom Is Still Empty
This is the simplest case: you do not need to prepare anything. Skynum creates all your products on Prom by itself, and each Skynum product is linked to its item on Prom automatically.
In the Item ID and Modification ID fields, choose Internal ID. Every Skynum product and modification has this number, and it never changes, so for this case it is the best choice.
You can choose other values too, but we do not recommend them: a product's code or SKU may change, and then Prom will create a second item for this product.
Save the integration and go on to importing products to Prom.
Option 2. You Already Sell on Prom
Your products are on Prom, and you are just starting to work in Skynum. Then the catalog is moved from Prom to Skynum through a Prom export file. During the import, each product in Skynum gets the number of its Prom item in the External Product ID field, and Skynum passes this number to Prom in the synchronization file. By it, Prom recognizes its items: the cards with reviews stay, and prices and availability start updating from Skynum.
First, export the catalog from Prom. In your Prom account, open Товари та послуги → Товари (Products and services → Products) and click Експорт (Export). Choose Експортувати всі групи та всі позиції (Export all groups and all items), Всі позиції (All items) and the Excel-файл (формат.xlsx) (Excel file,.xlsx format), then start the export.
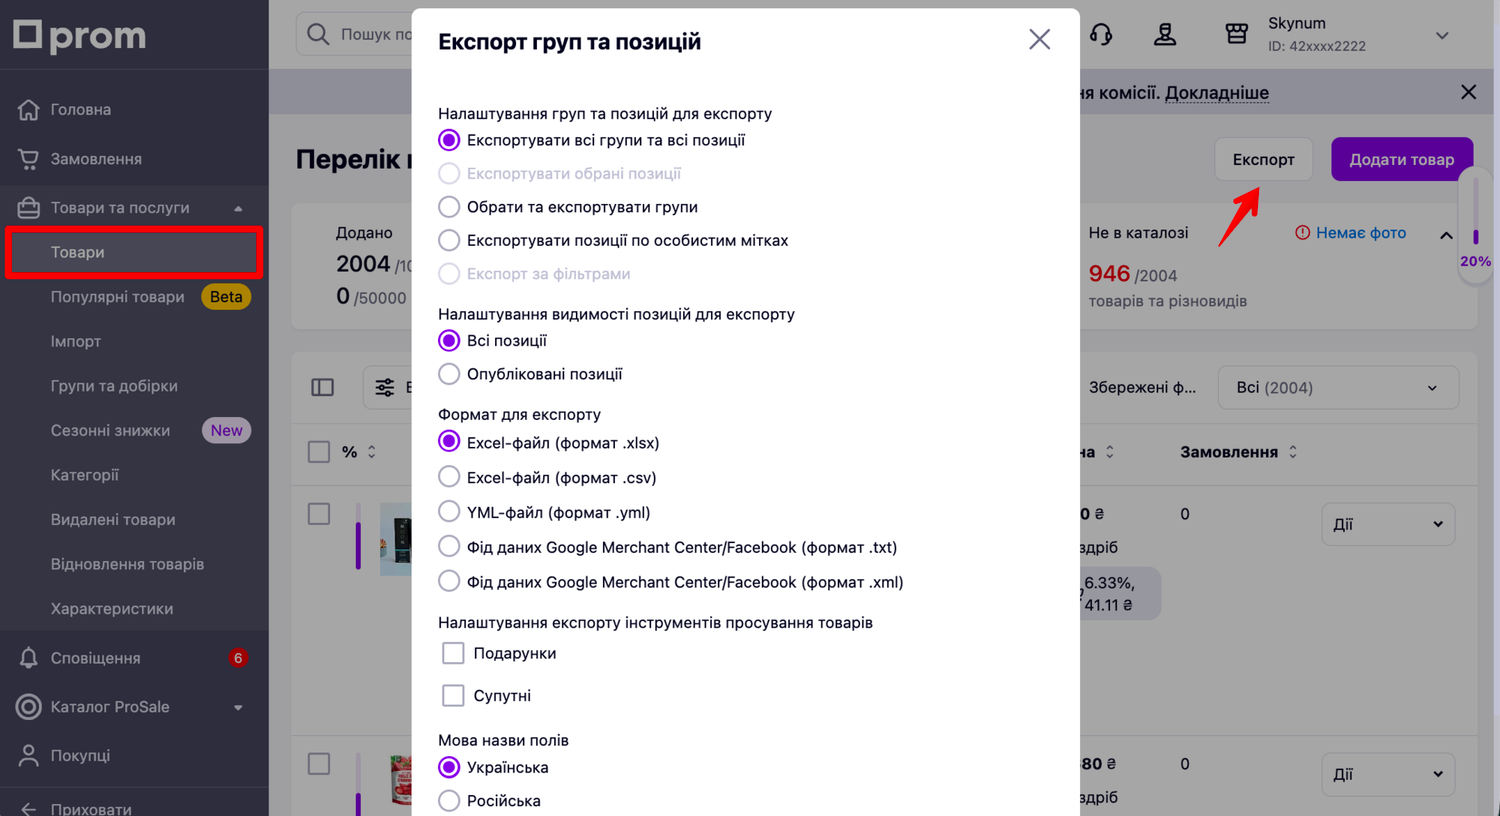
Prom sends a link to the file by email and shows it in the account's messages. The products are on the first sheet of the file — Export Products Sheet; each row is one item on Prom.
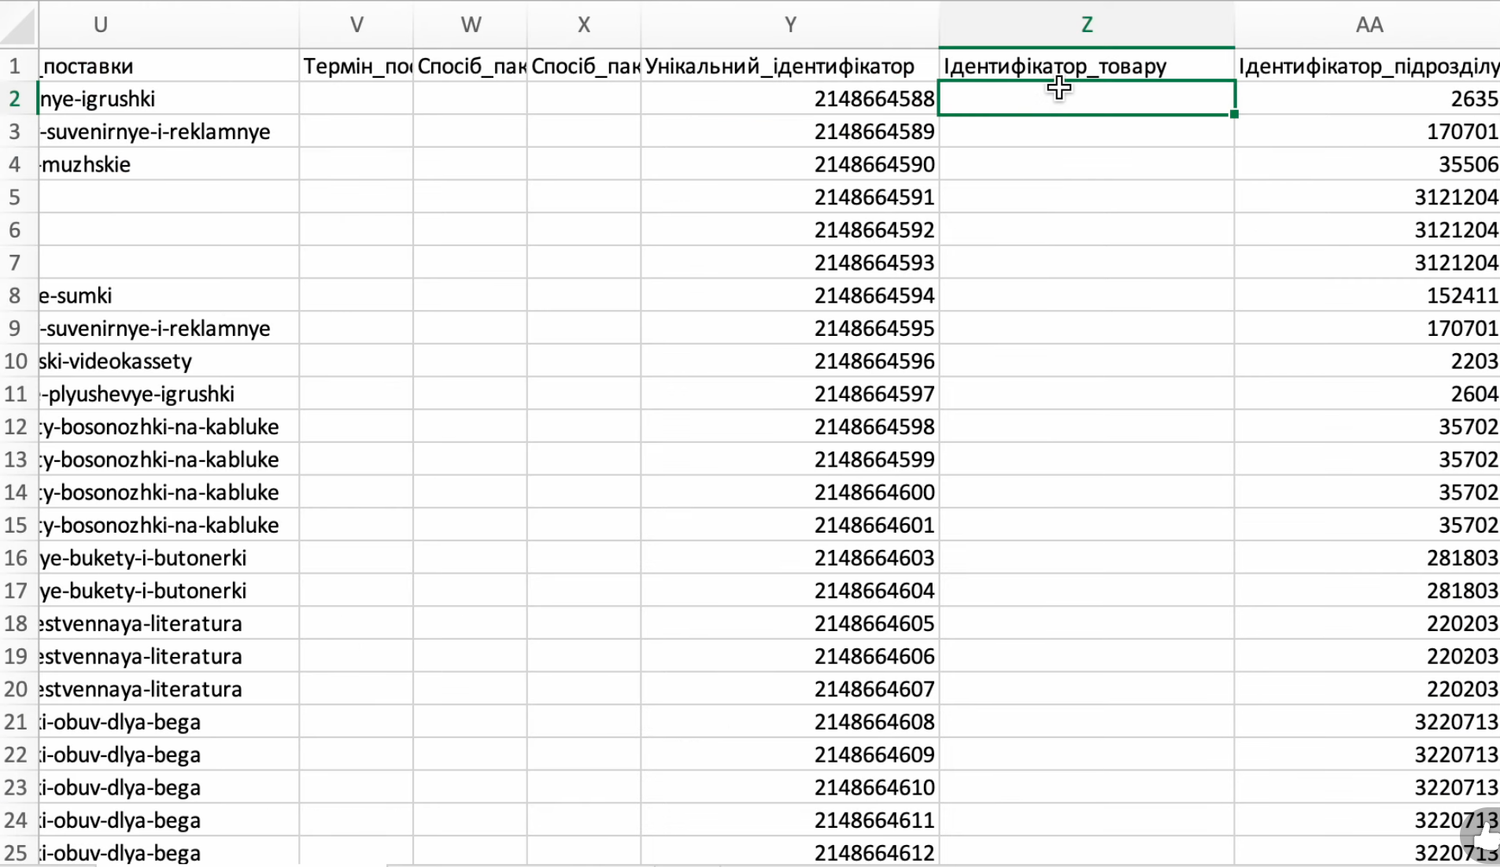
In the file, copy the whole Унікальний_ідентифікатор (Unique identifier) column into the Ідентифікатор_товару (Product identifier) column. Унікальний_ідентифікатор is the number Prom gave each item, and by the Ідентифікатор_товару column Prom will recognize the item when products come from Skynum. If the Ідентифікатор_товару column already contains something, replace it.
Save the file and upload it back to Prom. In your Prom account, open Товари та послуги → Імпорт (Products and services → Import), choose Завантажити файл з комп'ютера (Upload a file from the computer) and the saved file. Expand Налаштування імпорту (Import settings): in the Інформація, яку потрібно оновити (Information to update) block, leave all items selected; in the Статус товарів, яких немає в файлі (Status of products not in the file) block, choose Залишити без змін (Leave unchanged). Click Почати імпорт (Start import).
Now go to Skynum and import the same file: Products → All products → Options → Import. Above the file columns, choose the Skynum fields:
Column in the Prom file |
Field in Skynum |
|---|---|
Назва_позиції_укр |
Name |
Назва_позиції |
Name | RU |
Код_товару |
Commodity code |
Унікальний_ідентифікатор |
External Product ID |
Ціна |
Retail price |
Опис_укр |
Description of Goods |
Опис |
Description of Goods | RU |
Посилання_зображення |
Photos |
Назва_групи |
Category | Name |
Above the remaining columns, leave Not Selected.
Turn on Allow creation of records — then Skynum creates products from the file — and start the import.
Products with variants — sizes, colors — move to Skynum as one product with modifications. The rows of one product are linked by the ID_групи_різновидів (Variant group ID) column: choose External Product ID above it, Modification | External ID above Унікальний_ідентифікатор, and a modification feature above the size or color, for example Modification | Size. Import such rows separately from products without variants.
If you have many products with variants, write to Skynum support and send the catalog export from Prom — we will help move them.
After the import, open the Prom integration, choose External ID in the Item ID and Modification ID fields and save the integration. Done: now Prom and Skynum recognize the same products by the Prom number. Go on to importing products to Prom.
Importing Products by Link in Your Prom Account
In Skynum, open the Prom integration and copy the Commodity Synchronization (XML) File link from the Goods block. Then go back to your Prom account.
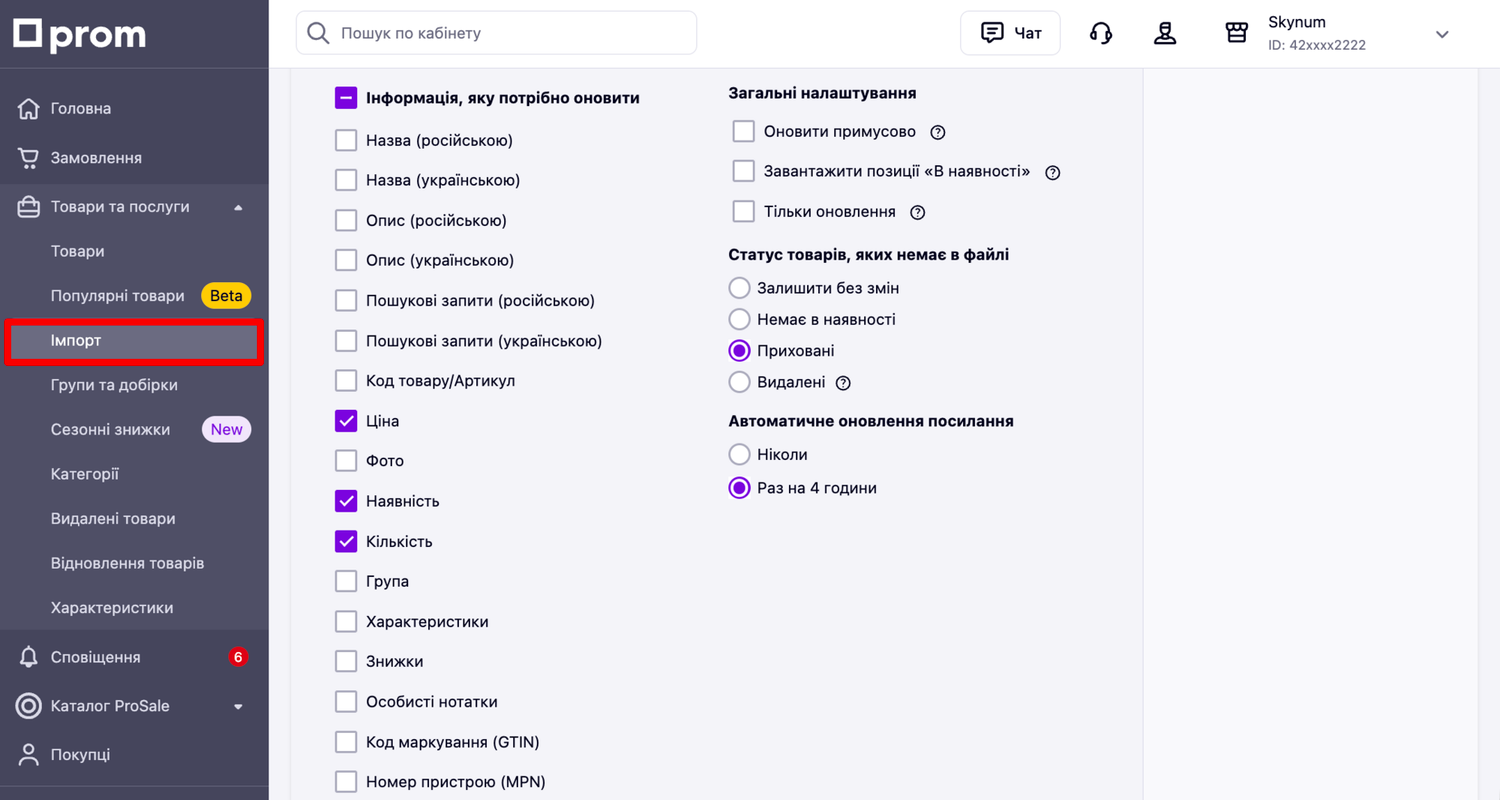
- Open Товари та послуги → Імпорт (Products and services → Import).
- Choose Завантажити файл з сервера (Upload a file from a server) and paste the link from Skynum into the Вкажіть посилання (Specify the link) field.
- Expand Налаштування імпорту (Import settings). In the Інформація, яку потрібно оновити (Information to update) block, select all items if you maintain product cards in Skynum. If you change descriptions and photos in your Prom account, select only Ціна (Price), Наявність (Availability) and Кількість (Quantity): Prom will not take the rest from the file.
- Do not turn on Завантажити позиції «В наявності» (Upload items as "In stock"): otherwise products that are no longer in the warehouse will be shown as available on Prom.
- In the Статус товарів, яких немає в файлі (Status of products not in the file) block, choose Приховані (Hidden) — this removes from sale the items that are not in the Skynum file, for example products you excluded from the upload.
- In the Автоматичне оновлення посилання (Automatic link update) block, choose Раз на 4 години (Once every 4 hours): this way Prom picks up the updated file by itself.
- Click Зберегти налаштування (Save settings), and then Почати імпорт (Start import).
Prom shows the progress and result of the import on the import page: how many items have been processed and which rows have errors. Most often, an error is caused by a product without a category or description. Fix the product in Skynum and start the import again after the next file update.
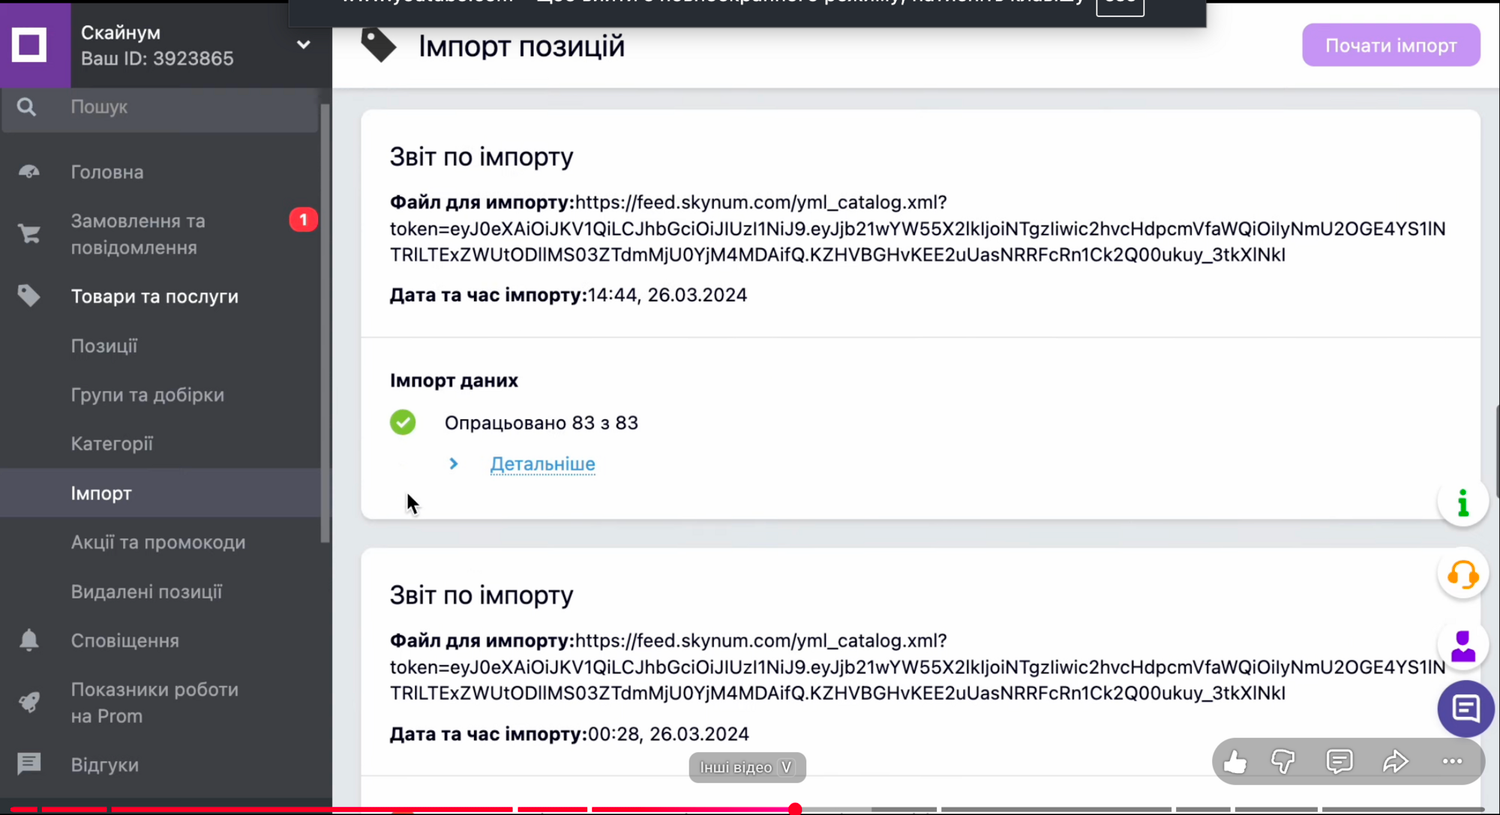
When the import is finished, open Товари та послуги → Товари (Products and services → Products) and check the name, price, availability, photos and variants of several products.
From then on, products are updated without your involvement. You change prices and stock balances in Skynum, and Prom picks up the updated file once every 4 hours and shows buyers up-to-date data. Products on Prom are set up — all that is left is to set up orders.
Loading Orders from Prom
Now go back to Skynum: open Settings → Integrations → Online Stores, then the Prom integration, and go to the Orders block.
Important. Turn on order synchronization after the first import of products to Prom: Skynum finds an order's product by the item identifier, and while an item on Prom has no identifier, the product will not get into the order.
Select Order sync active and fill in the fields:
- Sync Interval — every how many minutes Skynum checks for new orders on Prom.
- Ignore orders before date — orders created before this date will not get into Skynum. Set the connection day so as not to load old ones.
- Reserve items after the order is created — Skynum reserves the product as soon as it receives the order.
- Set external order number — the order in Skynum gets the number from Prom.
- Import Rechanged Orders — turn it on: if an order was changed on Prom, Skynum loads it again.
- Create a linked payment for the payment amount — Skynum creates a payment for an order paid through Prom.
- Auto fiscalize created payment and Fiscal provider for fiscalization — Skynum issues a fiscal receipt for this payment through the selected software cash register (PRRO).
- Order update method — what Skynum changes in an order that has already been loaded: Don’t update, Status only, Update Filled or Fully refresh. For a status changed on Prom to come into Skynum, choose Status only.
- Prevent updating orders in the status — (optional) repeated loading does not change orders in these statuses.
- Order Exports — Status only: Skynum passes every change of the order status to Prom.
- Warehouse of orders — the warehouse from which Skynum reserves and ships products of Prom orders. If one warehouse is selected in the Warehouse balances only field, choose the same one here.
- Sales Channel — the channel Skynum assigns orders from Prom to; reports count the marketplace's sales by it.
- Counterparty group — the group Skynum adds new buyers to.
- Default Counterparty — choose Create Counterparty, and every Prom buyer gets their own counterparty card in Skynum.
- Notify about new orders — (optional) which users learn about every new order.
Then match the statuses. Open the API mapping tab and click Load from Prom — Skynum gets the list of statuses of your Prom account. In the Statuses block, next to each Skynum status, choose the corresponding Prom status; each Prom status can be chosen only once. If there is no match, leave the field empty.
In the Payment block, match Prom payment methods with Skynum payment methods. Without this, Skynum will not create a payment and a receipt for a paid order, even if they are turned on in the Orders block. Save the integration. More details are in the article automatic fiscalization of online store orders.
Prom Orders at Work
Place a test order on Prom as a regular buyer, from your personal account. Then in Skynum, in the Prom integration, click Upload orders so as not to wait for the next check. Open Trading → Orders: the test order is already there, with its products, prices, buyer and delivery. If the order is not there, the Synchronization log tab in the integration shows the reason. To see only orders from the marketplace, choose Prom in the Source filter.
Then the manager works with a Prom order the same way as with any client order: checks the reservation, sends the parcel, receives the payment and changes the status. If the buyer chose Nova Poshta, Ukrposhta or Meest on Prom, their branch is already specified in the order's delivery. An individual order can be updated from Prom with the Upload button in the order itself.
Skynum receives a status changed on Prom with the next order loading. And a status the manager changed in Skynum is visible to the buyer in their Prom account: change the status of the test order in Skynum to one of the matched statuses and check that it has also changed on Prom.
Chat with Prom Buyers
Buyers write to the store on Prom and Bigl from a product page or from an order. Connect the chat — and these messages arrive in the Skynum Messenger section. Reply from there: right next to the conversation you can see whether the product is in stock and what the buyer has already ordered.
Connecting the Prom Chat
The chat is connected as a separate integration and works independently of products and orders. The chat needs a Prom token with Чат (Chat) access — Читання та запис (Read and write). If you opened this access when creating the token, the same token will work; if not, create a new one in your Prom account.
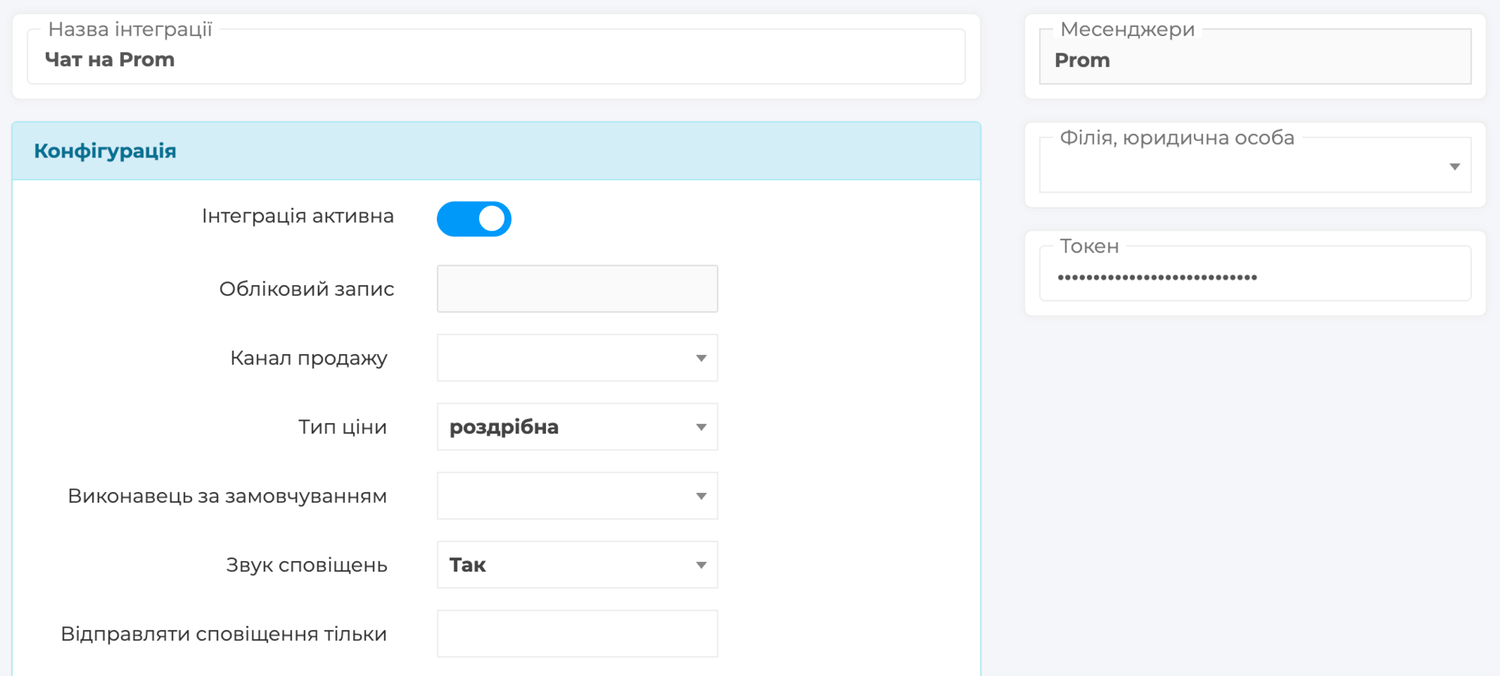
In Skynum, open Settings → Integrations → Messengers, click Add Integration and choose Prom in the list. Fill in the fields:
- Integration name — the name under which Prom chats are shown in the list of integrations and in the Messenger section.
- Integration Active — turn it on: otherwise buyers' messages will not arrive in Skynum.
- Sales channel — choose the same channel as in the Orders block of the Prom integration: then reports show all Prom sales together.
- Pricing Type — choose the same one as in the Product Price Type field of the Goods block: the buyer sees the same price in the chat as on Prom, and the product goes into the order at this price.
- Default Executor — (optional) the employee Skynum assigns every new Prom chat to.
- Notification sound — choose Yes to hear a signal when a buyer writes to the store.
- Send notifications only to — (optional) the employees who receive notifications about new messages from buyers. If the field is empty, notifications go to everyone who has access to the chats of this integration.
- Legal entity, branch — the branch that Prom chats belong to; employees with access to this branch reply in them.
- Token — paste the Prom token with Чат (Chat) access.
Click Save — the Check Connection button appears in the integration. Click it — Skynum shows the message Connection successfully verified.
Write to the store as a regular buyer, from your personal Prom account. Within a minute, the message appears in the Messenger section — reply to it, and the reply reaches you on Prom.
Important. When the token expires, the chat integration turns off: after replacing the token, turn on Integration Active in it again and save.
Conversations with Prom Buyers
Messages sent after the chat was connected get into Skynum. A buyer can send text, photos, PDF documents and an Order card with the order number on Prom. If this order is already in Skynum, click the card — and it opens. The chat shows the buyer's name and phone number, and Skynum links the chat to the counterparty with this number.
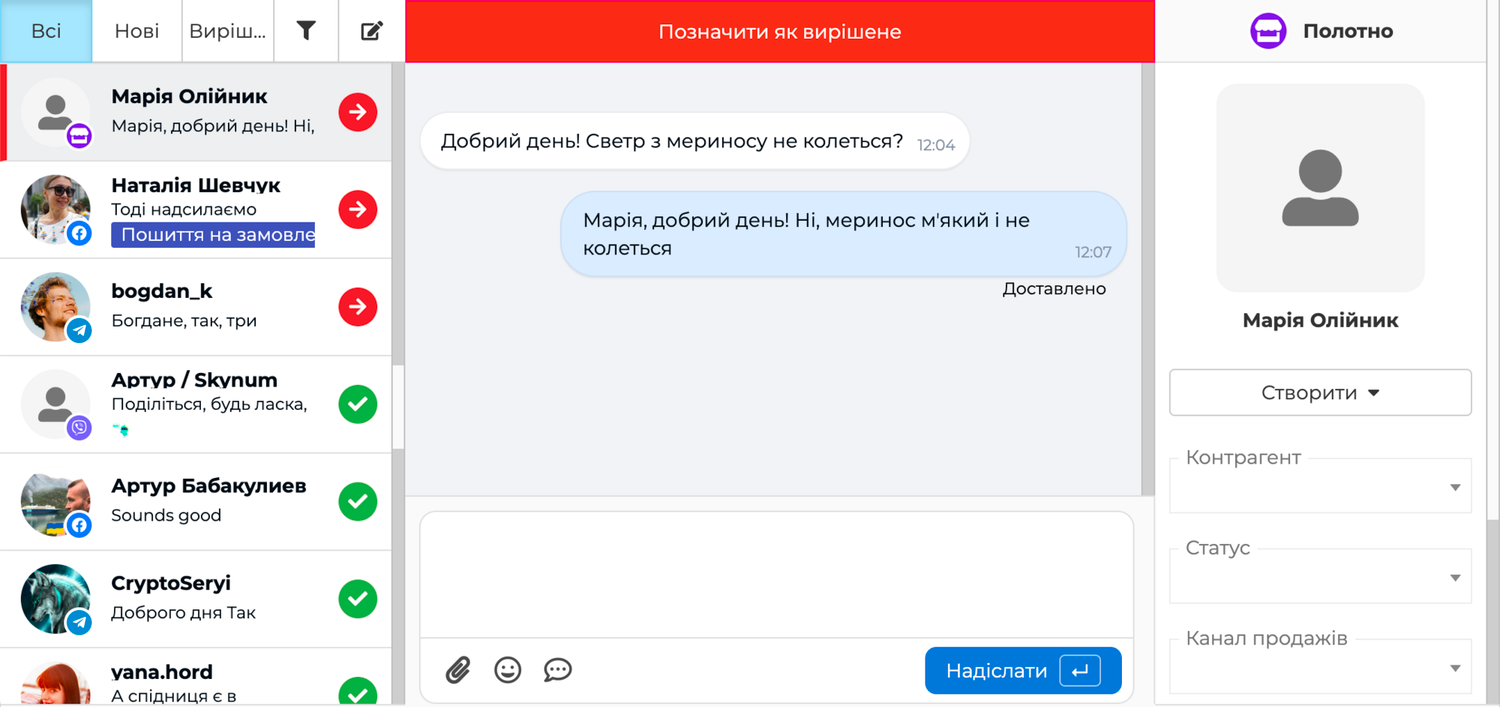
You can send a buyer text up to 1000 characters, photos, a PDF document and a product from the Skynum catalog. A text with a file reaches the buyer as two messages.
Prom chats are handled in the Messenger section — together with chats from Instagram, Facebook, WhatsApp, Telegram, Viber, the website and Rozetka. Next to the conversation you can see the counterparty and their orders; from the chat you can create an order and reply with a template — how this works is described in the article Messenger.
How It Works in Real Life
A Product Has Run Out in the Warehouse
The cashier sold the last unit through Skynum.Kasa, and the stock balance in Skynum became zero. With the next update, the item on Prom gets the "out of stock" status — the manager does not change anything manually. When the product arrives in the warehouse, the item will be in stock again.
A Buyer Asks About a Product in the Chat
From a product page on Prom, a buyer asks whether there is another size. The seller opens the chat in the Messenger section, sees the stock of the needed size in the Skynum catalog and sends this product to the buyer with a photo and price. The buyer orders on Prom — and the order arrives in Skynum.
A Buyer Paid Through Prom
Prom marks the order as paid. Skynum creates a payment for the paid amount, links it to the order and, if fiscalization is turned on, issues a receipt. The accountant sees the money in the cash desk or on the account without manual entry.
New Products in the Catalog
You have created new products in Skynum with a description, photos and a category. During the next automatic update, Prom adds them to the right group with prices and stock balances. You do not need to add them in the marketplace account separately.
All settings, file columns and matching of products with variants are collected in the Prom Integration section of the help centre, connecting the chat — in the Prom Chat section, and importing by link — in the Prom help centre (in Ukrainian).
Summary
Prom brings buyers, and Skynum handles everything that happens next. A CRM sees only a request in an order from Prom; in Skynum, it is backed by inventory, payment, a fiscal receipt and the conversation with the buyer. That is why Skynum shows how much Prom has earned: revenue, cost and profit next to other sales channels.